

24 Aug Monitoring Symbol deposits using Google Chrome Developer Console
This guide is translated from the original Qiita article written by nem_takanobu aka @xembook
I spotted this on Japanese Twitter and I thought I would test it out! This is a really nice article by the multitalented @xembook which allows you to monitor Symbol transactions using only Google Chrome Developer Console. Please read the previous translation “Experiment with Symbol using Google Chrome Developer Console!” first as it will provide you with a bit of background.
As usual I will try to explain each step of the process, and also as usual I will give you a disclaimer now that I am not a Javascript programmer so don’t get too annoyed with me if I get something wrong 😁
The setup
There are no installations required here. You will need to access the Testnet Faucet and explorer in this exercise and the code that you write will make use of @xembook‘s browserify that allows you to run Symbol SDK code through your web browser in the developer console without having to install or set anything up.
Getting started
We have already explained how to access the Google Chrome developer console in the previous article (so please check this out if you don’t know how to do it!).
Writing the code
First of all we need to connect to a testnet node and import browserify. Simply paste the following code into the developer console. This connects to the sym-test.opening-line.jp node on testnet and imports xembook’s Symbol SDK browserify.
NODE = 'https://sym-test.opening-line.jp:3001';

(script = document.createElement('script')).src = 'https://xembook.github.io/nem2-browserify/symbol-sdk-1.0.0.js';
document.getElementsByTagName('head')[0].appendChild(script);
You should see output in the console that looks something like this:

Next we want to be able to call symbol-sdk functions from nem.XXX
nem = require("/node_modules/symbol-sdk");Now we can get started!
Creating an account for Alice
First we want to create a new Symbol address on testnet. This will be Alice’s address:
alice = nem.Account.generateNewAccount(nem.NetworkType.TEST_NET);
You will see in the console that you can expand the output and view the details of Alice’s account. The account generation step will give you a different address each time you run it..
The account that I generated for Alice is TBSY62NBYBKRUQOHWXB2OQTYC6D4WZPJGDEDDRY.
Monitoring transactions on Alice’s account
Next comes the clever part. This piece of code starts the listener and establishes a WebSocket connection with the node. First we listen for a new block to be created so that we stay connected to the node and listening for our transactions of interest.
For further information please see the official Symbol documentation and guide.
nsHttp = new nem.NamespaceHttp(NODE);
wsEndpoint = NODE.replace('http', 'ws') + "/ws";
listener = new nem.Listener(wsEndpoint,nsHttp,WebSocket);

listener.open().then(() => {
    listener.newBlock();
});
Setting the trigger
Next we need to write some code to tell the listener what to listen out for and report on. Here we tell it to report any confirmed deposits to Alice’s account. When she receives a transfer to her account a popup will be displayed to inform us of the deposit! I am sure that you could make this more elaborate and display the block, time, sender, amount or anything else that you want to report here.
The final two lines print out URLs that I will explain shortly.
listener.confirmed(alice.address)
.subscribe(tx => {
    alert("Transaction confirmed!")
    console.log("http://explorer.testnet.symboldev.network/accounts/" + alice.address.plain());
    console.log("http://explorer.testnet.symboldev.network/transactions/" + tx.transactionInfo.hash);

});
Test that it is working..
Here we generate a URL that will request 1 XYM to be sent from the faucet to Alice’s testnet account. Just run this line of code, click the link and then request the funds, all of the correct information will be prefilled in the faucet form.
"http://faucet.testnet.symboldev.network/?recipient=" + alice.address.plain() +"&amount=1"
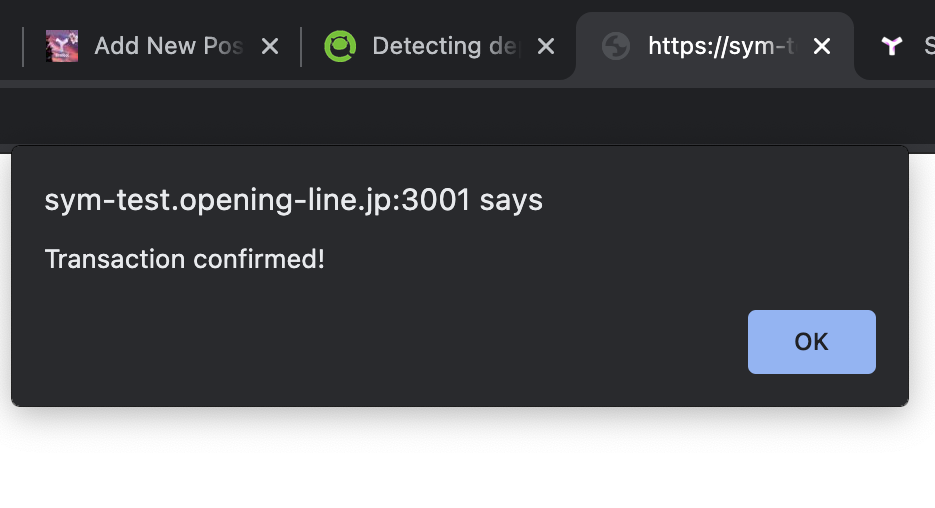
When this transaction has been confirmed (it may take a minute) we should also receive a notification that will tell us that Alice has been sent some funds.. And sure enough we do – here’s the notification in the browser!
You will also notice that there are two additional URLs generated in your developer console.
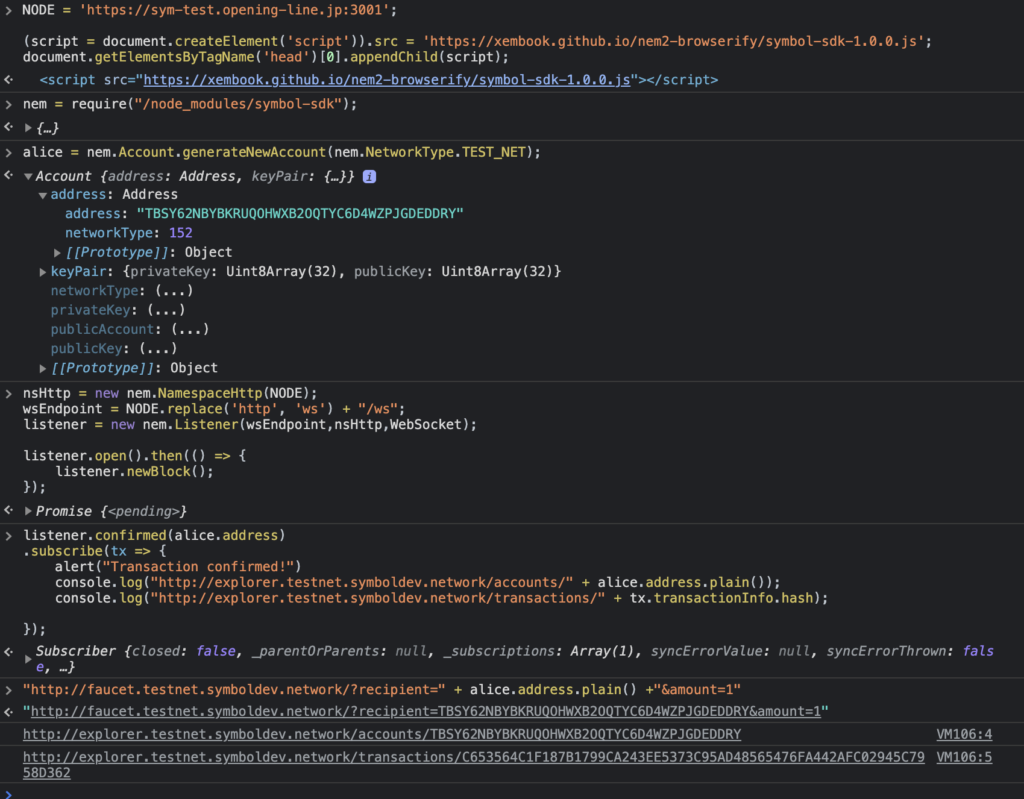
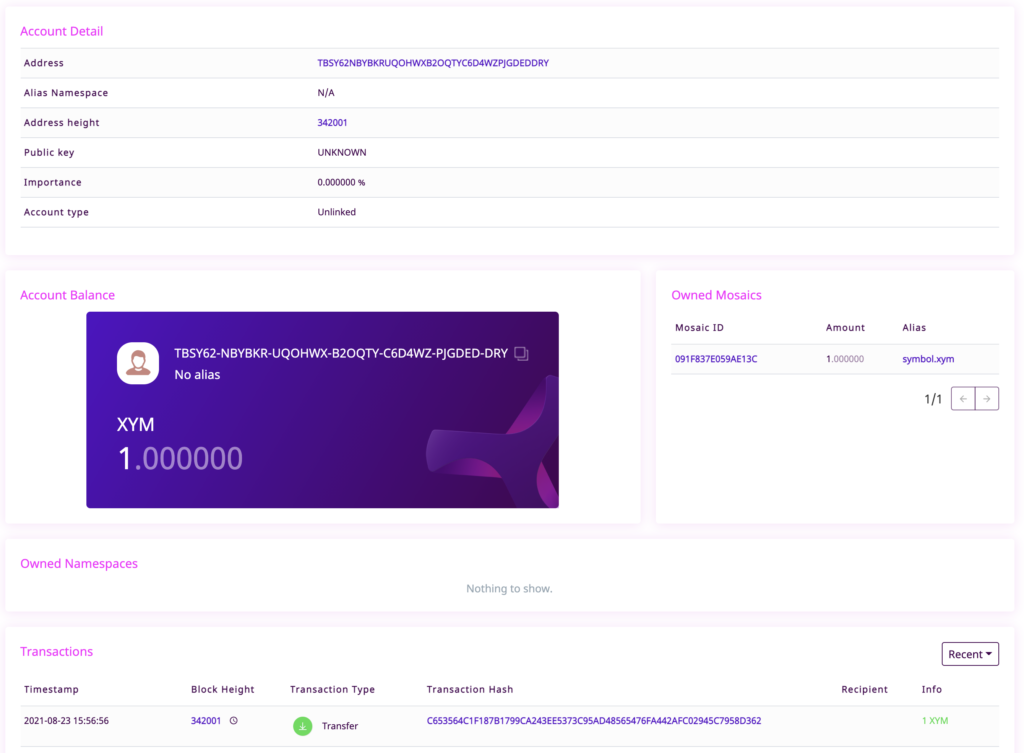
These URLs link to the testnet explorer and show details of Alice’s account and the transaction. In my case they looked like this

So that’s it! As simple as that. You can run all of this code in the Google Chrome Developer Console without having to install or configure anything on your local computer.
This is a very simple example but it gives you some building blocks to work from. Maybe you could try to edit the code and make it more elaborate. Perhaps you could set up a simple harvest monitor or print some additional information about the transaction in the notification. E.g. you could enter the block height that the transaction was received.
listener.confirmed(alice.address)
.subscribe(tx => {
    alert("transaction received at block:" + tx.transactionInfo.height)
    console.log("http://explorer.testnet.symboldev.network/accounts/" + alice.address.plain());
    console.log("http://explorer.testnet.symboldev.network/transactions/" + tx.transactionInfo.hash);

});
You could even return the amount received. I need to look up how to do this so let me know how you get on in the comments! 😁
Once again I want to say a huge thank you to @xembook for his original article!
I’m a Symbol and NEM enthusiast and run this blog to try to grow awareness of the platform in the English-speaking world. If you have any Symbol news you would like me to report on or you have an article that you would like to publish then please let me know!
Sorry, the comment form is closed at this time.