

02 Aug Aggregate Transactions in Python – (Part 2)
This guide is translated from the original Qiita article written by nem_takanobu aka @xembook
Last week we published an article on how to send aggregate transactions on the Symbol blockchain. The previous example showed how to send funds from a single account to multiple recipients. In this article, we will take this concept a step further and show how to set up a transaction that will send funds from multiple accounts.
This gets more complex and I am learning as I go along too but I will try to explain the steps to you in plain English so you know what you are doing as you work through the example. Please read the previous Python articles first as a lot of the concepts have been explained in these.
In this example, Alice will send 2 XYM and a message to Bob and Bob will send 1 XYM and a message to Alice within the same transaction.
The setup
As in previous examples we need to import the required modules and then set up an account for Alice and Bob. Again the example will be run on the testnet.
from binascii import unhexlify
from symbolchain.core.CryptoTypes import PrivateKey
from symbolchain.core.sym.KeyPair import KeyPair
from symbolchain.core.facade.SymFacade import SymFacade

facade = SymFacade('public_test')
We will set up a new account for Alice.
In @xembook‘s example, he uses an existing private key for Alice but here I have set up a fresh account
TBTQHDNSVYRVGPXL673RJNOBISA3DREW6XWQFJY
alicePrikey = PrivateKey.random()
aliceKeypair = SymFacade.KeyPair(alicePrikey)
alicePubkey = aliceKeypair.public_key
aliceAddress = facade.network.public_key_to_address(alicePubkey)

print(str(aliceAddress))
Note: When you run this code you will generate a new account with a different address.
Next, we set up a new account for Bob in the same way. In my example Bob’s address is
TAFES2KAN63OMJGPKAGUQ6TX33ZFNHQ7JVTWGTIBob will co-sign transactions but Alice does not know (and should never know!) Bob’s private key. Alice only needs to construct the transaction using Bob’s public key and account address
(strBobPubkey, strBobAddress)for Bob to sign later.
bobPrikey = PrivateKey.random()
bobKeypair = SymFacade.KeyPair(bobPrikey)
strBobPubkey = str(bobKeypair.public_key)
strBobAddress = str(facade.network.public_key_to_address(bobKeypair.public_key))
Creating the transaction
Alice sets up the transaction. In this case, Alice will send 2 XYM to Bob with the message “Hello Bob, I have sent you 2 XYM!”. Bob will send 1 XYM to Alice with the message “Hello Alice, I have sent you 1 XYM!”.
The creator, Alice, creates the transaction and will pay all network fees. Two transactions will be included in the aggregate:
aliceTxwhich will be signed by Alice, and
bobTxwhich requires Bob’s signature.
Once Alice has signed the aggregate transaction she can notify Bob of the hash value hexlifiedHash
(in this case b'c99366f1387e8008db8f3a45e666702a50d57e56815448306a93a2db98f90383')and Bob can sign this offline using his private key.
from symbolchain.core.CryptoTypes import PublicKey
bobPubkey = PublicKey(unhexlify(strBobPubkey))
bobAddress = SymFacade.Address(strBobAddress)


# Here are the messages that we want to send

msgA = 'Hello Alice, I have sent you 1 XYM!'
msgB = 'Hello Bob, I have sent you 2 XYM!'

mosaic_id = 0x091F837E059AE13C

# Set up Bob's transaction

bobTx = facade.transaction_factory.create_embedded({
    'type': 'transfer',
    'signer_public_key': bobPubkey,
    'recipient_address': aliceAddress,
    'mosaics': [(mosaic_id, 1000000)],
    'message': bytes(1) + msgA.encode('utf8')
})

# Set up Alice's transaction

aliceTx = facade.transaction_factory.create_embedded({
    'type': 'transfer',
    'signer_public_key': alicePubkey,
    'recipient_address': bobAddress,
    'mosaics': [(mosaic_id, 2000000)],
    'message': bytes(1) + msgB.encode('utf8')
})

# Build the Merkle hash

hash_builder = MerkleHashBuilder()
hash_builder.update(Hash256(sha3.sha3_256(aliceTx.serialize()).digest()))
hash_builder.update(Hash256(sha3.sha3_256(bobTx.serialize()).digest()))
merkle_hash = hash_builder.final()

import datetime
deadline = (int((datetime.datetime.today() + datetime.timedelta(hours=2)).timestamp()) - 1616694977) * 1000

# Set up the aggregate transaction with the transactions and the Merkle hash we just created
# Alice signs the transaction

aggregate = facade.transaction_factory.create({
    'type': 'aggregateComplete',
    'signer_public_key': alicePubkey,
    'fee': 1000000,
    'deadline': deadline,
    'transactions_hash': merkle_hash,
    'transactions': [aliceTx,bobTx]
})

# Alice can sign the transaction but she has no access to Bob's private key so he will have to sign separately
hashLockTx = facade.transaction_factory.create({
'type': 'hashLock',
'signer_public_key': alicePubkey,
'fee': 1000000,
'deadline': deadline,
'hash': hash,
'mosaic': (0x091F837E059AE13C, 10000000),
'duration': 480
})

# Alice then signs the hashlock transaction
signature = facade.sign_transaction(aliceKeypair, aggregate)
aggregate.signature = signature.bytes

# Alice can provide Bob with the hexlifiedHash and he can sign this separately
from binascii import hexlify hash = facade.hash_transaction(aggregate).bytes hexlifiedHash = hexlify(hash) print(hexlifiedHash)
The contents ofhexlifiedHash:
b'c99366f1387e8008db8f3a45e666702a50d57e56815448306a93a2db98f90383'Are sent to Bob to sign.
Bob signs the hash
Bob is sent the contents ofhexlifiedHash outside of the network to sign:
# Bob then has to sign the hash that Alice produced
# In our case it was b'c99366f1387e8008db8f3a45e666702a50d57e56815448306a93a2db98f90383' and this is stored inhexlifiedHash

hexlifiedSignedHash = str(bobKeypair.sign(unhexlify(hexlifiedHash)))
print(hexlifiedSignedHash)
This then gives us a hash that is signed by Bob(hexlifiedSignedHash):
F3C97CC0243E569114F73EDDBFDC016BECBA5A6CC3B0F7AD62101662F2456DF777EC09471089B4706DFE3490FB69174A06539D34B7093AF0E7F3D5D36CB8DC0FBob can return the signed hash to Alice e.g. in an email.
Announce the transaction
Upon receiving the signature from Bob, Alice incorporates Bob’s co-signature into the transaction that she has already signed and then announces it to the network.
cosignature = (0, bobPubkey.bytes, unhexlify(hexlifiedSignedHash))
aggregate.cosignatures.append(cosignature)

from binascii import hexlify
payload = {"payload": hexlify(aggregate.serialize()).decode('utf8').upper()}

import json
jsonPayload = json.dumps(payload)
headers = {'Content-type': 'application/json'}

import http.client
conn = http.client.HTTPConnection("sym-test-01.opening-line.jp",3000)
conn.request("PUT", "/transactions", jsonPayload,headers)

response = conn.getresponse()
print(response.status, response.reason)
As in previous examples, a status of “202 Accepted” means that the transaction was accepted by the node.
202 AcceptedVerifying the transaction
Next, we can verify the status of the transaction by querying the node. This code will produce a URL that you can click to see the transaction status:
hash = facade.hash_transaction(aggregate)
print('https://sym-test-01.opening-line.jp:3001/transactionStatus/' + str(hash))
Output Transaction Status Here
{"group":"confirmed","code":"Success","hash":"62E9177BD0AD568D450C9AF4FA0134FB46EE1411A37C7135A6E3BB73FB85DFD8","deadline":"11230771000","height":"290527"}We can see after clicking the link that it has been confirmed "group":"confirmed","code":"Success"
We can also check the hash in the explorer
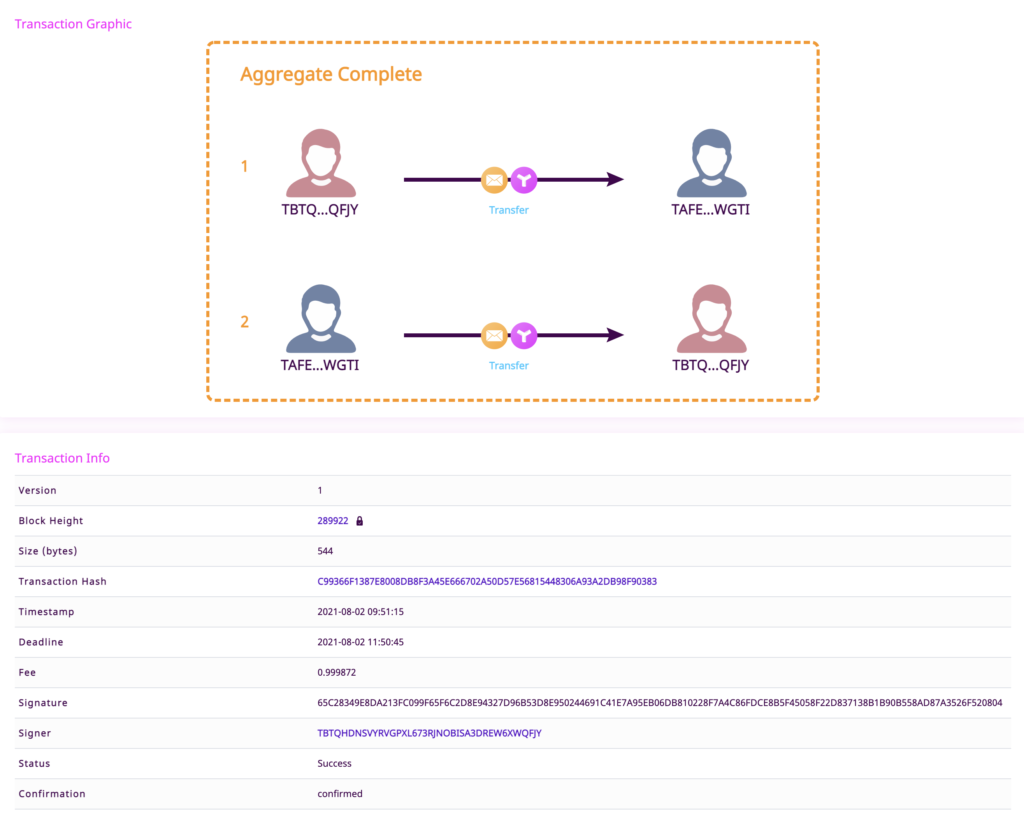
And we can view the transactions in the aggregate my mousing over the message and transfer icons:
Final notes
I didn’t think this through before I modified xembook’s code to include an XYM transfer but the result is kind of cool. As you probably worked out, Bob’s account is empty but he is sending 1 XYM to Alice in the aggregate. Why doesn’t the transfer fail? 🤔
Well, Alice is sending 2 XYM to Bob within the same transaction. Alice sends 2 XYM to Bob and Bob sends 1 XYM back to Alice. This leaves Alice with 1 less XYM in her final balance (excluding network fees) and Bob has +1 XYM since he has returned 1 of the 2 XYM he was sent, back to Alice. Not sure why you would want to do this in real life but it shows that it can be done since the balance transfers are wrapped up in a single transaction. I guess that the network knows that Bob is good for the money as Alice has included it in the same aggregate 😊 Also, as in xembook’s example where only messages (and no mosaics) were sent, Bob is still able to send a message to Alice since Alice is paying the network fees for all of the transactions.
So again this was a great learning experience for me! As you noticed there are some steps in this example that had to be completed offline. Alice had to send a hash to Bob to sign and then Bob had to send the signed hash back to Alice. This works fine but is a bit inconvenient. In the next example (coming soon) we will make use of aggregate bonded transactions that eliminate this offline step.
As usual, I have provided a Jupyter Notebook for you to work through the example.
I’m a Symbol and NEM enthusiast and run this blog to try to grow awareness of the platform in the English-speaking world. If you have any Symbol news you would like me to report on or you have an article that you would like to publish then please let me know!
Sorry, the comment form is closed at this time.