

28 Jul Aggregate transactions in Python
This guide is translated from the original Qiita article written by nem_takanobu aka @xembook
In today’s post we will do something that I have never attempted before and will send an aggregate transaction. We will send XYM and a message to multiple recipients in a single transaction using the Symbol Python SDK. The example will use the Symbol testnet so no real XYM will be sent and you can be confident experimenting without any risk.
I have used @xembook‘s example from this article but have edited slightly just to add a mosaic transfer into the aggregate.
Creating new accounts to work with
In this exercise we will send testnet XYM from one account to two different recipients. We can create these accounts in Python. Here I will create Alice’s account but in@xembook‘s example the account details are generated from an existing private key so if you want to do this please check hisarticle.
First import the required packages
from binascii import unhexlify
from symbolchain.core.CryptoTypes import PrivateKey
from symbolchain.core.sym.KeyPair import KeyPair
from symbolchain.core.facade.SymFacade import SymFacade
facade = SymFacade('public_test')
Then create the accounts
We can also check this in the explorer and we see a visual representation of the transaction.
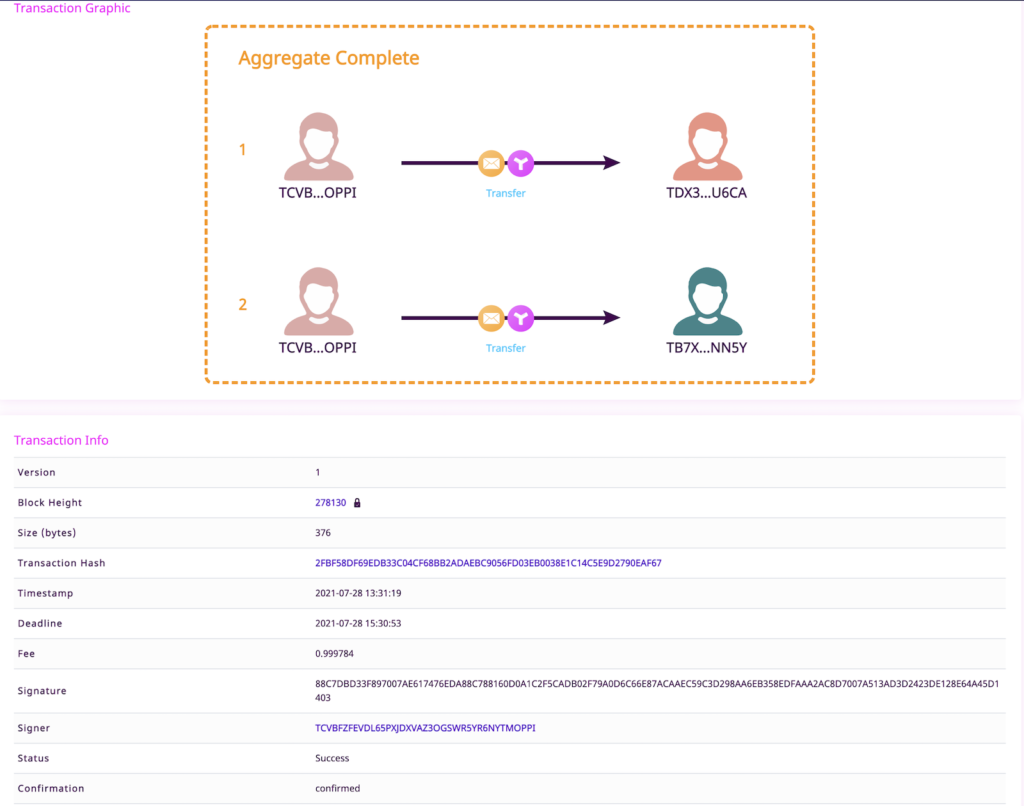
Also if you mouse over the the transfer icons it shows you the message and the amount sent to Bob and Carol.
OK so that is everything – I have made my first aggregate transaction on the Symbol blockchain! 🤩 As usual feel free to experiment, edit and expand. I have included my Jupyter Notebook here so that you can run the code yourself!
Edit: I have just finished writing this and seen a post by @nobu_kyutech, author of the previous Python examples we translated and it is on aggregate transactions! Please also check out his post as there are some subtle differences.
Thanks for reading! 😊
If you click the URL generated you will see that the transaction was successful:
{"group":"confirmed","code":"Success","hash":"2FBF58DF69EDB33C04CF68BB2ADAEBC9056FD03EB0038E1C14C5E9D2790EAF67","deadline":"10791276000","height":"278130"}We can also check this in the explorer and we see a visual representation of the transaction.
Also if you mouse over the the transfer icons it shows you the message and the amount sent to Bob and Carol.
OK so that is everything – I have made my first aggregate transaction on the Symbol blockchain! 🤩 As usual feel free to experiment, edit and expand. I have included my Jupyter Notebook here so that you can run the code yourself!
Edit: I have just finished writing this and seen a post by @nobu_kyutech, author of the previous Python examples we translated and it is on aggregate transactions! Please also check out his post as there are some subtle differences.
Thanks for reading! 😊
Verifying the transaction
hash = facade.hash_transaction(aggregate)
print('https://sym-test-01.opening-line.jp:3001/transactionStatus/' + str(hash))https://sym-test-01.opening-line.jp:3001/transactionStatus/2FBF58DF69EDB33C04CF68BB2ADAEBC9056FD03EB0038E1C14C5E9D2790EAF67
If you click the URL generated you will see that the transaction was successful:
{"group":"confirmed","code":"Success","hash":"2FBF58DF69EDB33C04CF68BB2ADAEBC9056FD03EB0038E1C14C5E9D2790EAF67","deadline":"10791276000","height":"278130"}We can also check this in the explorer and we see a visual representation of the transaction.
Also if you mouse over the the transfer icons it shows you the message and the amount sent to Bob and Carol.
OK so that is everything – I have made my first aggregate transaction on the Symbol blockchain! 🤩 As usual feel free to experiment, edit and expand. I have included my Jupyter Notebook here so that you can run the code yourself!
Edit: I have just finished writing this and seen a post by @nobu_kyutech, author of the previous Python examples we translated and it is on aggregate transactions! Please also check out his post as there are some subtle differences.
Thanks for reading! 😊
We can then verify the transaction has been confirmed. The code below generates a URL which will allow you to check the status on the node.Verifying the transaction
hash = facade.hash_transaction(aggregate)
print('https://sym-test-01.opening-line.jp:3001/transactionStatus/' + str(hash))https://sym-test-01.opening-line.jp:3001/transactionStatus/2FBF58DF69EDB33C04CF68BB2ADAEBC9056FD03EB0038E1C14C5E9D2790EAF67
If you click the URL generated you will see that the transaction was successful:
{"group":"confirmed","code":"Success","hash":"2FBF58DF69EDB33C04CF68BB2ADAEBC9056FD03EB0038E1C14C5E9D2790EAF67","deadline":"10791276000","height":"278130"}We can also check this in the explorer and we see a visual representation of the transaction.
Also if you mouse over the the transfer icons it shows you the message and the amount sent to Bob and Carol.
OK so that is everything – I have made my first aggregate transaction on the Symbol blockchain! 🤩 As usual feel free to experiment, edit and expand. I have included my Jupyter Notebook here so that you can run the code yourself!
Edit: I have just finished writing this and seen a post by @nobu_kyutech, author of the previous Python examples we translated and it is on aggregate transactions! Please also check out his post as there are some subtle differences.
Thanks for reading! 😊
We can then verify the transaction has been confirmed. The code below generates a URL which will allow you to check the status on the node.
Verifying the transaction
hash = facade.hash_transaction(aggregate)
print('https://sym-test-01.opening-line.jp:3001/transactionStatus/' + str(hash))https://sym-test-01.opening-line.jp:3001/transactionStatus/2FBF58DF69EDB33C04CF68BB2ADAEBC9056FD03EB0038E1C14C5E9D2790EAF67
If you click the URL generated you will see that the transaction was successful:
{"group":"confirmed","code":"Success","hash":"2FBF58DF69EDB33C04CF68BB2ADAEBC9056FD03EB0038E1C14C5E9D2790EAF67","deadline":"10791276000","height":"278130"}We can also check this in the explorer and we see a visual representation of the transaction.
Also if you mouse over the the transfer icons it shows you the message and the amount sent to Bob and Carol.
OK so that is everything – I have made my first aggregate transaction on the Symbol blockchain! 🤩 As usual feel free to experiment, edit and expand. I have included my Jupyter Notebook here so that you can run the code yourself!
Edit: I have just finished writing this and seen a post by @nobu_kyutech, author of the previous Python examples we translated and it is on aggregate transactions! Please also check out his post as there are some subtle differences.
Thanks for reading! 😊
We see that the transaction was successful!
202 AcceptedWe can then verify the transaction has been confirmed. The code below generates a URL which will allow you to check the status on the node.
Verifying the transaction
hash = facade.hash_transaction(aggregate)
print('https://sym-test-01.opening-line.jp:3001/transactionStatus/' + str(hash))https://sym-test-01.opening-line.jp:3001/transactionStatus/2FBF58DF69EDB33C04CF68BB2ADAEBC9056FD03EB0038E1C14C5E9D2790EAF67
If you click the URL generated you will see that the transaction was successful:
{"group":"confirmed","code":"Success","hash":"2FBF58DF69EDB33C04CF68BB2ADAEBC9056FD03EB0038E1C14C5E9D2790EAF67","deadline":"10791276000","height":"278130"}We can also check this in the explorer and we see a visual representation of the transaction.
Also if you mouse over the the transfer icons it shows you the message and the amount sent to Bob and Carol.
OK so that is everything – I have made my first aggregate transaction on the Symbol blockchain! 🤩 As usual feel free to experiment, edit and expand. I have included my Jupyter Notebook here so that you can run the code yourself!
Edit: I have just finished writing this and seen a post by @nobu_kyutech, author of the previous Python examples we translated and it is on aggregate transactions! Please also check out his post as there are some subtle differences.
Thanks for reading! 😊
Next we need to announce the transaction to the node. If successful we will receive a response of “202 Accepted”
from binascii import hexlify
payload = {"payload": hexlify(aggregate.serialize()).decode('utf8').upper()}
import json
json = json.dumps(payload)
headers = {'Content-type': 'application/json'}
import http.client
conn = http.client.HTTPConnection("sym-test-01.opening-line.jp",3000)
conn.request("PUT", "/transactions", json,headers)
response = conn.getresponse()
print(response.status, response.reason)
We see that the transaction was successful!
202 AcceptedWe can then verify the transaction has been confirmed. The code below generates a URL which will allow you to check the status on the node.
Verifying the transaction
hash = facade.hash_transaction(aggregate)
print('https://sym-test-01.opening-line.jp:3001/transactionStatus/' + str(hash))https://sym-test-01.opening-line.jp:3001/transactionStatus/2FBF58DF69EDB33C04CF68BB2ADAEBC9056FD03EB0038E1C14C5E9D2790EAF67
If you click the URL generated you will see that the transaction was successful:
{"group":"confirmed","code":"Success","hash":"2FBF58DF69EDB33C04CF68BB2ADAEBC9056FD03EB0038E1C14C5E9D2790EAF67","deadline":"10791276000","height":"278130"}We can also check this in the explorer and we see a visual representation of the transaction.
Also if you mouse over the the transfer icons it shows you the message and the amount sent to Bob and Carol.
OK so that is everything – I have made my first aggregate transaction on the Symbol blockchain! 🤩 As usual feel free to experiment, edit and expand. I have included my Jupyter Notebook here so that you can run the code yourself!
Edit: I have just finished writing this and seen a post by @nobu_kyutech, author of the previous Python examples we translated and it is on aggregate transactions! Please also check out his post as there are some subtle differences.
Thanks for reading! 😊
Then Alice signs the aggregate transactionaggregate.
import datetime
deadline = (int((datetime.datetime.today() + datetime.timedelta(hours=2)).timestamp()) - 1616694977) * 1000
aggregate = facade.transaction_factory.create({
    'type': 'aggregateComplete',
    'signer_public_key': alicePubkey,
    'fee': 1000000,
    'deadline': deadline,
    'transactions_hash': merkle_hash,
    'transactions': [bobTx,carolTx]
})
signature = facade.sign_transaction(aliceKeypair, aggregate)
aggregate.signature = signature.bytes
Announcing the transaction
Next we need to announce the transaction to the node. If successful we will receive a response of “202 Accepted”
from binascii import hexlify
payload = {"payload": hexlify(aggregate.serialize()).decode('utf8').upper()}
import json
json = json.dumps(payload)
headers = {'Content-type': 'application/json'}
import http.client
conn = http.client.HTTPConnection("sym-test-01.opening-line.jp",3000)
conn.request("PUT", "/transactions", json,headers)
response = conn.getresponse()
print(response.status, response.reason)
We see that the transaction was successful!
202 AcceptedWe can then verify the transaction has been confirmed. The code below generates a URL which will allow you to check the status on the node.
Verifying the transaction
hash = facade.hash_transaction(aggregate)
print('https://sym-test-01.opening-line.jp:3001/transactionStatus/' + str(hash))https://sym-test-01.opening-line.jp:3001/transactionStatus/2FBF58DF69EDB33C04CF68BB2ADAEBC9056FD03EB0038E1C14C5E9D2790EAF67
If you click the URL generated you will see that the transaction was successful:
{"group":"confirmed","code":"Success","hash":"2FBF58DF69EDB33C04CF68BB2ADAEBC9056FD03EB0038E1C14C5E9D2790EAF67","deadline":"10791276000","height":"278130"}We can also check this in the explorer and we see a visual representation of the transaction.
Also if you mouse over the the transfer icons it shows you the message and the amount sent to Bob and Carol.
OK so that is everything – I have made my first aggregate transaction on the Symbol blockchain! 🤩 As usual feel free to experiment, edit and expand. I have included my Jupyter Notebook here so that you can run the code yourself!
Edit: I have just finished writing this and seen a post by @nobu_kyutech, author of the previous Python examples we translated and it is on aggregate transactions! Please also check out his post as there are some subtle differences.
Thanks for reading! 😊
Further reading for those that are interested: Merkle Trees and Ralph Merkle (thanks @gimre for picking me up on my spelling – and thanks for reading the blog!).
from symbolchain.core.sym.MerkleHashBuilder import MerkleHashBuilder
from symbolchain.core.CryptoTypes import Hash256
import sha3
hash_builder = MerkleHashBuilder()
hash_builder.update(Hash256(sha3.sha3_256(bobTx.serialize()).digest()))
hash_builder.update(Hash256(sha3.sha3_256(carolTx.serialize()).digest()))
merkle_hash = hash_builder.final()
Creating our aggregate transaction
Here we set a transaction deadline and have to import an extra module datetime. As explained in this article we have to calculate the deadline using the time that the testnet went live “1616694977” and as the deadline is in milliseconds we need to multiply the resulting value by 1000.
The aggregate transaction is signed by Alice and has a maxFee value of 1 XYM (1000000 microXYM). We provide the Merkle hash (merkle_hash) we just generated and include the two transactions that we set up previously bobTX and carolTx.
Then Alice signs the aggregate transactionaggregate.
import datetime
deadline = (int((datetime.datetime.today() + datetime.timedelta(hours=2)).timestamp()) - 1616694977) * 1000
aggregate = facade.transaction_factory.create({
    'type': 'aggregateComplete',
    'signer_public_key': alicePubkey,
    'fee': 1000000,
    'deadline': deadline,
    'transactions_hash': merkle_hash,
    'transactions': [bobTx,carolTx]
})
signature = facade.sign_transaction(aliceKeypair, aggregate)
aggregate.signature = signature.bytes
Announcing the transaction
Next we need to announce the transaction to the node. If successful we will receive a response of “202 Accepted”
from binascii import hexlify
payload = {"payload": hexlify(aggregate.serialize()).decode('utf8').upper()}
import json
json = json.dumps(payload)
headers = {'Content-type': 'application/json'}
import http.client
conn = http.client.HTTPConnection("sym-test-01.opening-line.jp",3000)
conn.request("PUT", "/transactions", json,headers)
response = conn.getresponse()
print(response.status, response.reason)
We see that the transaction was successful!
202 AcceptedWe can then verify the transaction has been confirmed. The code below generates a URL which will allow you to check the status on the node.
Verifying the transaction
hash = facade.hash_transaction(aggregate)
print('https://sym-test-01.opening-line.jp:3001/transactionStatus/' + str(hash))https://sym-test-01.opening-line.jp:3001/transactionStatus/2FBF58DF69EDB33C04CF68BB2ADAEBC9056FD03EB0038E1C14C5E9D2790EAF67
If you click the URL generated you will see that the transaction was successful:
{"group":"confirmed","code":"Success","hash":"2FBF58DF69EDB33C04CF68BB2ADAEBC9056FD03EB0038E1C14C5E9D2790EAF67","deadline":"10791276000","height":"278130"}We can also check this in the explorer and we see a visual representation of the transaction.
Also if you mouse over the the transfer icons it shows you the message and the amount sent to Bob and Carol.
OK so that is everything – I have made my first aggregate transaction on the Symbol blockchain! 🤩 As usual feel free to experiment, edit and expand. I have included my Jupyter Notebook here so that you can run the code yourself!
Edit: I have just finished writing this and seen a post by @nobu_kyutech, author of the previous Python examples we translated and it is on aggregate transactions! Please also check out his post as there are some subtle differences.
Thanks for reading! 😊
First I say what mosaic ID I would like to transfer – in this case I enter the ID of testnet XYM but it could be any mosaic on testnet.
mosaic_id = 0x091F837E059AE13CNext we set up two transfer transactions bobTx and carolTx which will both be signed by Alice. All we need here are Alice’s public key and Bob and Carol’s account addresses. We send 1 XYM to Bob and 2 XYM to Carol. We also create a message with the string “test” which will be send to both recipients.
msg = 'test'
bobTx = facade.transaction_factory.create_embedded({
    'type': 'transfer',
    'signer_public_key': alicePubkey,
    'recipient_address': bobAddress,
    'mosaics': [(mosaic_id, 1000000)],
    'message': bytes(1) + msg.encode('utf8')
})
carolTx = facade.transaction_factory.create_embedded({
    'type': 'transfer',
    'signer_public_key': alicePubkey,
    'recipient_address': carolAddress,
    'mosaics': [(mosaic_id, 2000000)],
    'message': bytes(1) + msg.encode('utf8')
})
Create a Merkle hash
OK, here I am at the limit of my understanding but will attempt to explain! 😁 We need to create a Merkle hash which I believe will be used to store all transactions to be included in the block. As we are making multiple transactions we derive the hash of the aggregate transaction from each individual transaction hash. We need to do this as we are creating a complex transaction – if you want to make a simple transfer transaction from one account to another then please see this article.
Further reading for those that are interested: Merkle Trees and Ralph Merkle (thanks @gimre for picking me up on my spelling – and thanks for reading the blog!).
from symbolchain.core.sym.MerkleHashBuilder import MerkleHashBuilder
from symbolchain.core.CryptoTypes import Hash256
import sha3
hash_builder = MerkleHashBuilder()
hash_builder.update(Hash256(sha3.sha3_256(bobTx.serialize()).digest()))
hash_builder.update(Hash256(sha3.sha3_256(carolTx.serialize()).digest()))
merkle_hash = hash_builder.final()
Creating our aggregate transaction
Here we set a transaction deadline and have to import an extra module datetime. As explained in this article we have to calculate the deadline using the time that the testnet went live “1616694977” and as the deadline is in milliseconds we need to multiply the resulting value by 1000.
The aggregate transaction is signed by Alice and has a maxFee value of 1 XYM (1000000 microXYM). We provide the Merkle hash (merkle_hash) we just generated and include the two transactions that we set up previously bobTX and carolTx.
Then Alice signs the aggregate transactionaggregate.
import datetime
deadline = (int((datetime.datetime.today() + datetime.timedelta(hours=2)).timestamp()) - 1616694977) * 1000
aggregate = facade.transaction_factory.create({
    'type': 'aggregateComplete',
    'signer_public_key': alicePubkey,
    'fee': 1000000,
    'deadline': deadline,
    'transactions_hash': merkle_hash,
    'transactions': [bobTx,carolTx]
})
signature = facade.sign_transaction(aliceKeypair, aggregate)
aggregate.signature = signature.bytes
Announcing the transaction
Next we need to announce the transaction to the node. If successful we will receive a response of “202 Accepted”
from binascii import hexlify
payload = {"payload": hexlify(aggregate.serialize()).decode('utf8').upper()}
import json
json = json.dumps(payload)
headers = {'Content-type': 'application/json'}
import http.client
conn = http.client.HTTPConnection("sym-test-01.opening-line.jp",3000)
conn.request("PUT", "/transactions", json,headers)
response = conn.getresponse()
print(response.status, response.reason)
We see that the transaction was successful!
202 AcceptedWe can then verify the transaction has been confirmed. The code below generates a URL which will allow you to check the status on the node.
Verifying the transaction
hash = facade.hash_transaction(aggregate)
print('https://sym-test-01.opening-line.jp:3001/transactionStatus/' + str(hash))https://sym-test-01.opening-line.jp:3001/transactionStatus/2FBF58DF69EDB33C04CF68BB2ADAEBC9056FD03EB0038E1C14C5E9D2790EAF67
If you click the URL generated you will see that the transaction was successful:
{"group":"confirmed","code":"Success","hash":"2FBF58DF69EDB33C04CF68BB2ADAEBC9056FD03EB0038E1C14C5E9D2790EAF67","deadline":"10791276000","height":"278130"}We can also check this in the explorer and we see a visual representation of the transaction.
Also if you mouse over the the transfer icons it shows you the message and the amount sent to Bob and Carol.
OK so that is everything – I have made my first aggregate transaction on the Symbol blockchain! 🤩 As usual feel free to experiment, edit and expand. I have included my Jupyter Notebook here so that you can run the code yourself!
Edit: I have just finished writing this and seen a post by @nobu_kyutech, author of the previous Python examples we translated and it is on aggregate transactions! Please also check out his post as there are some subtle differences.
Thanks for reading! 😊
Once you have requested the funds they should be confirmed in Alice’s account within a minute. We can check this on the testnet explorer.
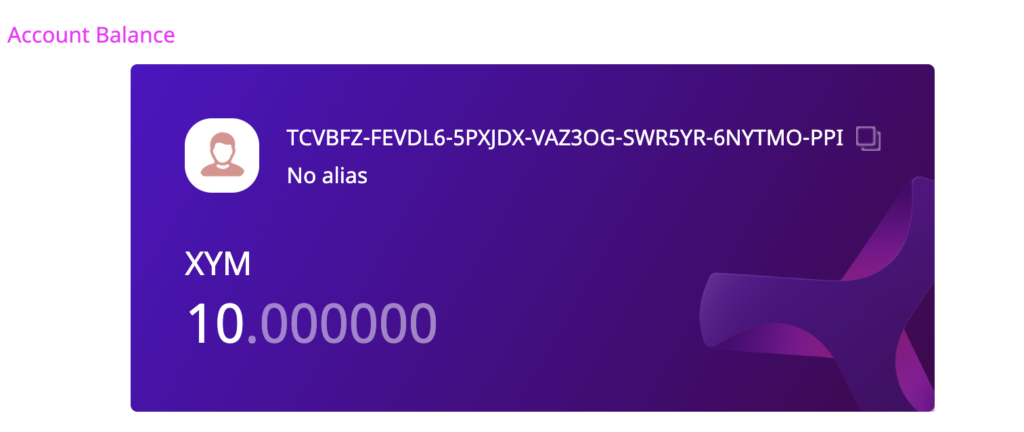
So we can see that Alice now has 10 XYM in her account. Now she can send funds to Bob and Carol in an aggregate transaction!
Setting up the transaction
First I say what mosaic ID I would like to transfer – in this case I enter the ID of testnet XYM but it could be any mosaic on testnet.
mosaic_id = 0x091F837E059AE13CNext we set up two transfer transactions bobTx and carolTx which will both be signed by Alice. All we need here are Alice’s public key and Bob and Carol’s account addresses. We send 1 XYM to Bob and 2 XYM to Carol. We also create a message with the string “test” which will be send to both recipients.
msg = 'test'
bobTx = facade.transaction_factory.create_embedded({
    'type': 'transfer',
    'signer_public_key': alicePubkey,
    'recipient_address': bobAddress,
    'mosaics': [(mosaic_id, 1000000)],
    'message': bytes(1) + msg.encode('utf8')
})
carolTx = facade.transaction_factory.create_embedded({
    'type': 'transfer',
    'signer_public_key': alicePubkey,
    'recipient_address': carolAddress,
    'mosaics': [(mosaic_id, 2000000)],
    'message': bytes(1) + msg.encode('utf8')
})
Create a Merkle hash
OK, here I am at the limit of my understanding but will attempt to explain! 😁 We need to create a Merkle hash which I believe will be used to store all transactions to be included in the block. As we are making multiple transactions we derive the hash of the aggregate transaction from each individual transaction hash. We need to do this as we are creating a complex transaction – if you want to make a simple transfer transaction from one account to another then please see this article.
Further reading for those that are interested: Merkle Trees and Ralph Merkle (thanks @gimre for picking me up on my spelling – and thanks for reading the blog!).
from symbolchain.core.sym.MerkleHashBuilder import MerkleHashBuilder
from symbolchain.core.CryptoTypes import Hash256
import sha3
hash_builder = MerkleHashBuilder()
hash_builder.update(Hash256(sha3.sha3_256(bobTx.serialize()).digest()))
hash_builder.update(Hash256(sha3.sha3_256(carolTx.serialize()).digest()))
merkle_hash = hash_builder.final()
Creating our aggregate transaction
Here we set a transaction deadline and have to import an extra module datetime. As explained in this article we have to calculate the deadline using the time that the testnet went live “1616694977” and as the deadline is in milliseconds we need to multiply the resulting value by 1000.
The aggregate transaction is signed by Alice and has a maxFee value of 1 XYM (1000000 microXYM). We provide the Merkle hash (merkle_hash) we just generated and include the two transactions that we set up previously bobTX and carolTx.
Then Alice signs the aggregate transactionaggregate.
import datetime
deadline = (int((datetime.datetime.today() + datetime.timedelta(hours=2)).timestamp()) - 1616694977) * 1000
aggregate = facade.transaction_factory.create({
    'type': 'aggregateComplete',
    'signer_public_key': alicePubkey,
    'fee': 1000000,
    'deadline': deadline,
    'transactions_hash': merkle_hash,
    'transactions': [bobTx,carolTx]
})
signature = facade.sign_transaction(aliceKeypair, aggregate)
aggregate.signature = signature.bytes
Announcing the transaction
Next we need to announce the transaction to the node. If successful we will receive a response of “202 Accepted”
from binascii import hexlify
payload = {"payload": hexlify(aggregate.serialize()).decode('utf8').upper()}
import json
json = json.dumps(payload)
headers = {'Content-type': 'application/json'}
import http.client
conn = http.client.HTTPConnection("sym-test-01.opening-line.jp",3000)
conn.request("PUT", "/transactions", json,headers)
response = conn.getresponse()
print(response.status, response.reason)
We see that the transaction was successful!
202 AcceptedWe can then verify the transaction has been confirmed. The code below generates a URL which will allow you to check the status on the node.
Verifying the transaction
hash = facade.hash_transaction(aggregate)
print('https://sym-test-01.opening-line.jp:3001/transactionStatus/' + str(hash))https://sym-test-01.opening-line.jp:3001/transactionStatus/2FBF58DF69EDB33C04CF68BB2ADAEBC9056FD03EB0038E1C14C5E9D2790EAF67
If you click the URL generated you will see that the transaction was successful:
{"group":"confirmed","code":"Success","hash":"2FBF58DF69EDB33C04CF68BB2ADAEBC9056FD03EB0038E1C14C5E9D2790EAF67","deadline":"10791276000","height":"278130"}We can also check this in the explorer and we see a visual representation of the transaction.
Also if you mouse over the the transfer icons it shows you the message and the amount sent to Bob and Carol.
OK so that is everything – I have made my first aggregate transaction on the Symbol blockchain! 🤩 As usual feel free to experiment, edit and expand. I have included my Jupyter Notebook here so that you can run the code yourself!
Edit: I have just finished writing this and seen a post by @nobu_kyutech, author of the previous Python examples we translated and it is on aggregate transactions! Please also check out his post as there are some subtle differences.
Thanks for reading! 😊
We need to give Alice some funds as her account is empty and she wants to send some XYM to Bob and Carol. We can do this by requesting some testnet XYM at the faucet. Just enter Alice’s account address. in my case it isTCVBFZFEVDL65PXJDXVAZ3OGSWR5YR6NYTMOPPI but when you run the code above you will generate different random addresses.
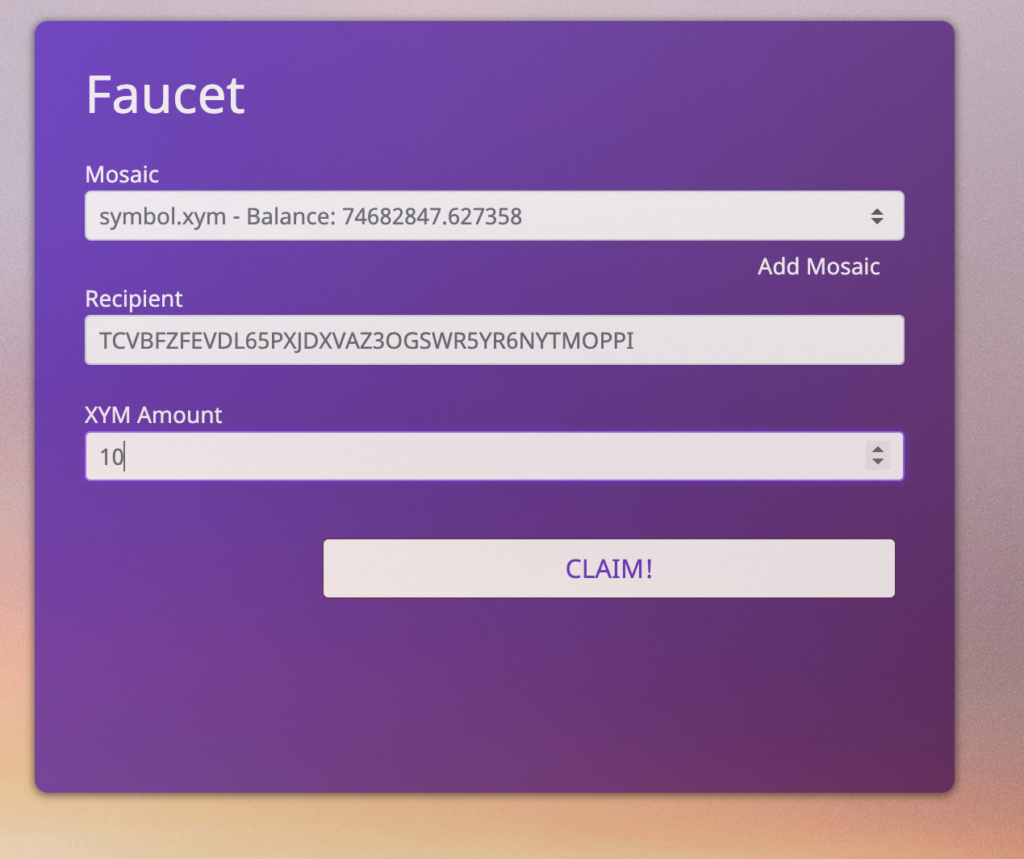
Once you have requested the funds they should be confirmed in Alice’s account within a minute. We can check this on the testnet explorer.
So we can see that Alice now has 10 XYM in her account. Now she can send funds to Bob and Carol in an aggregate transaction!
Setting up the transaction
First I say what mosaic ID I would like to transfer – in this case I enter the ID of testnet XYM but it could be any mosaic on testnet.
mosaic_id = 0x091F837E059AE13CNext we set up two transfer transactions bobTx and carolTx which will both be signed by Alice. All we need here are Alice’s public key and Bob and Carol’s account addresses. We send 1 XYM to Bob and 2 XYM to Carol. We also create a message with the string “test” which will be send to both recipients.
msg = 'test'
bobTx = facade.transaction_factory.create_embedded({
    'type': 'transfer',
    'signer_public_key': alicePubkey,
    'recipient_address': bobAddress,
    'mosaics': [(mosaic_id, 1000000)],
    'message': bytes(1) + msg.encode('utf8')
})
carolTx = facade.transaction_factory.create_embedded({
    'type': 'transfer',
    'signer_public_key': alicePubkey,
    'recipient_address': carolAddress,
    'mosaics': [(mosaic_id, 2000000)],
    'message': bytes(1) + msg.encode('utf8')
})
Create a Merkle hash
OK, here I am at the limit of my understanding but will attempt to explain! 😁 We need to create a Merkle hash which I believe will be used to store all transactions to be included in the block. As we are making multiple transactions we derive the hash of the aggregate transaction from each individual transaction hash. We need to do this as we are creating a complex transaction – if you want to make a simple transfer transaction from one account to another then please see this article.
Further reading for those that are interested: Merkle Trees and Ralph Merkle (thanks @gimre for picking me up on my spelling – and thanks for reading the blog!).
from symbolchain.core.sym.MerkleHashBuilder import MerkleHashBuilder
from symbolchain.core.CryptoTypes import Hash256
import sha3
hash_builder = MerkleHashBuilder()
hash_builder.update(Hash256(sha3.sha3_256(bobTx.serialize()).digest()))
hash_builder.update(Hash256(sha3.sha3_256(carolTx.serialize()).digest()))
merkle_hash = hash_builder.final()
Creating our aggregate transaction
Here we set a transaction deadline and have to import an extra module datetime. As explained in this article we have to calculate the deadline using the time that the testnet went live “1616694977” and as the deadline is in milliseconds we need to multiply the resulting value by 1000.
The aggregate transaction is signed by Alice and has a maxFee value of 1 XYM (1000000 microXYM). We provide the Merkle hash (merkle_hash) we just generated and include the two transactions that we set up previously bobTX and carolTx.
Then Alice signs the aggregate transactionaggregate.
import datetime
deadline = (int((datetime.datetime.today() + datetime.timedelta(hours=2)).timestamp()) - 1616694977) * 1000
aggregate = facade.transaction_factory.create({
    'type': 'aggregateComplete',
    'signer_public_key': alicePubkey,
    'fee': 1000000,
    'deadline': deadline,
    'transactions_hash': merkle_hash,
    'transactions': [bobTx,carolTx]
})
signature = facade.sign_transaction(aliceKeypair, aggregate)
aggregate.signature = signature.bytes
Announcing the transaction
Next we need to announce the transaction to the node. If successful we will receive a response of “202 Accepted”
from binascii import hexlify
payload = {"payload": hexlify(aggregate.serialize()).decode('utf8').upper()}
import json
json = json.dumps(payload)
headers = {'Content-type': 'application/json'}
import http.client
conn = http.client.HTTPConnection("sym-test-01.opening-line.jp",3000)
conn.request("PUT", "/transactions", json,headers)
response = conn.getresponse()
print(response.status, response.reason)
We see that the transaction was successful!
202 AcceptedWe can then verify the transaction has been confirmed. The code below generates a URL which will allow you to check the status on the node.
Verifying the transaction
hash = facade.hash_transaction(aggregate)
print('https://sym-test-01.opening-line.jp:3001/transactionStatus/' + str(hash))https://sym-test-01.opening-line.jp:3001/transactionStatus/2FBF58DF69EDB33C04CF68BB2ADAEBC9056FD03EB0038E1C14C5E9D2790EAF67
If you click the URL generated you will see that the transaction was successful:
{"group":"confirmed","code":"Success","hash":"2FBF58DF69EDB33C04CF68BB2ADAEBC9056FD03EB0038E1C14C5E9D2790EAF67","deadline":"10791276000","height":"278130"}We can also check this in the explorer and we see a visual representation of the transaction.
Also if you mouse over the the transfer icons it shows you the message and the amount sent to Bob and Carol.
OK so that is everything – I have made my first aggregate transaction on the Symbol blockchain! 🤩 As usual feel free to experiment, edit and expand. I have included my Jupyter Notebook here so that you can run the code yourself!
Edit: I have just finished writing this and seen a post by @nobu_kyutech, author of the previous Python examples we translated and it is on aggregate transactions! Please also check out his post as there are some subtle differences.
Thanks for reading! 😊
carolPrikey = PrivateKey.random()
carolKeypair = SymFacade.KeyPair(carolPrikey)
carolPubkey = carolKeypair.public_key
carolAddress = facade.network.public_key_to_address(carolPubkey)
print(str(carolAddress))TB7XUKLOT4LDFMX5TCEMXEBGO3CIMML4MNINN5YFunding Alice’s account
We need to give Alice some funds as her account is empty and she wants to send some XYM to Bob and Carol. We can do this by requesting some testnet XYM at the faucet. Just enter Alice’s account address. in my case it isTCVBFZFEVDL65PXJDXVAZ3OGSWR5YR6NYTMOPPI but when you run the code above you will generate different random addresses.
Once you have requested the funds they should be confirmed in Alice’s account within a minute. We can check this on the testnet explorer.
So we can see that Alice now has 10 XYM in her account. Now she can send funds to Bob and Carol in an aggregate transaction!
Setting up the transaction
First I say what mosaic ID I would like to transfer – in this case I enter the ID of testnet XYM but it could be any mosaic on testnet.
mosaic_id = 0x091F837E059AE13CNext we set up two transfer transactions bobTx and carolTx which will both be signed by Alice. All we need here are Alice’s public key and Bob and Carol’s account addresses. We send 1 XYM to Bob and 2 XYM to Carol. We also create a message with the string “test” which will be send to both recipients.
msg = 'test'
bobTx = facade.transaction_factory.create_embedded({
    'type': 'transfer',
    'signer_public_key': alicePubkey,
    'recipient_address': bobAddress,
    'mosaics': [(mosaic_id, 1000000)],
    'message': bytes(1) + msg.encode('utf8')
})
carolTx = facade.transaction_factory.create_embedded({
    'type': 'transfer',
    'signer_public_key': alicePubkey,
    'recipient_address': carolAddress,
    'mosaics': [(mosaic_id, 2000000)],
    'message': bytes(1) + msg.encode('utf8')
})
Create a Merkle hash
OK, here I am at the limit of my understanding but will attempt to explain! 😁 We need to create a Merkle hash which I believe will be used to store all transactions to be included in the block. As we are making multiple transactions we derive the hash of the aggregate transaction from each individual transaction hash. We need to do this as we are creating a complex transaction – if you want to make a simple transfer transaction from one account to another then please see this article.
Further reading for those that are interested: Merkle Trees and Ralph Merkle (thanks @gimre for picking me up on my spelling – and thanks for reading the blog!).
from symbolchain.core.sym.MerkleHashBuilder import MerkleHashBuilder
from symbolchain.core.CryptoTypes import Hash256
import sha3
hash_builder = MerkleHashBuilder()
hash_builder.update(Hash256(sha3.sha3_256(bobTx.serialize()).digest()))
hash_builder.update(Hash256(sha3.sha3_256(carolTx.serialize()).digest()))
merkle_hash = hash_builder.final()
Creating our aggregate transaction
Here we set a transaction deadline and have to import an extra module datetime. As explained in this article we have to calculate the deadline using the time that the testnet went live “1616694977” and as the deadline is in milliseconds we need to multiply the resulting value by 1000.
The aggregate transaction is signed by Alice and has a maxFee value of 1 XYM (1000000 microXYM). We provide the Merkle hash (merkle_hash) we just generated and include the two transactions that we set up previously bobTX and carolTx.
Then Alice signs the aggregate transactionaggregate.
import datetime
deadline = (int((datetime.datetime.today() + datetime.timedelta(hours=2)).timestamp()) - 1616694977) * 1000
aggregate = facade.transaction_factory.create({
    'type': 'aggregateComplete',
    'signer_public_key': alicePubkey,
    'fee': 1000000,
    'deadline': deadline,
    'transactions_hash': merkle_hash,
    'transactions': [bobTx,carolTx]
})
signature = facade.sign_transaction(aliceKeypair, aggregate)
aggregate.signature = signature.bytes
Announcing the transaction
Next we need to announce the transaction to the node. If successful we will receive a response of “202 Accepted”
from binascii import hexlify
payload = {"payload": hexlify(aggregate.serialize()).decode('utf8').upper()}
import json
json = json.dumps(payload)
headers = {'Content-type': 'application/json'}
import http.client
conn = http.client.HTTPConnection("sym-test-01.opening-line.jp",3000)
conn.request("PUT", "/transactions", json,headers)
response = conn.getresponse()
print(response.status, response.reason)
We see that the transaction was successful!
202 AcceptedWe can then verify the transaction has been confirmed. The code below generates a URL which will allow you to check the status on the node.
Verifying the transaction
hash = facade.hash_transaction(aggregate)
print('https://sym-test-01.opening-line.jp:3001/transactionStatus/' + str(hash))https://sym-test-01.opening-line.jp:3001/transactionStatus/2FBF58DF69EDB33C04CF68BB2ADAEBC9056FD03EB0038E1C14C5E9D2790EAF67
If you click the URL generated you will see that the transaction was successful:
{"group":"confirmed","code":"Success","hash":"2FBF58DF69EDB33C04CF68BB2ADAEBC9056FD03EB0038E1C14C5E9D2790EAF67","deadline":"10791276000","height":"278130"}We can also check this in the explorer and we see a visual representation of the transaction.
Also if you mouse over the the transfer icons it shows you the message and the amount sent to Bob and Carol.
OK so that is everything – I have made my first aggregate transaction on the Symbol blockchain! 🤩 As usual feel free to experiment, edit and expand. I have included my Jupyter Notebook here so that you can run the code yourself!
Edit: I have just finished writing this and seen a post by @nobu_kyutech, author of the previous Python examples we translated and it is on aggregate transactions! Please also check out his post as there are some subtle differences.
Thanks for reading! 😊
TDX3FEYHRRGFFSXEWA5CL5XKFX2IKIQAIWVU6CAcarolPrikey = PrivateKey.random()
carolKeypair = SymFacade.KeyPair(carolPrikey)
carolPubkey = carolKeypair.public_key
carolAddress = facade.network.public_key_to_address(carolPubkey)
print(str(carolAddress))TB7XUKLOT4LDFMX5TCEMXEBGO3CIMML4MNINN5YFunding Alice’s account
We need to give Alice some funds as her account is empty and she wants to send some XYM to Bob and Carol. We can do this by requesting some testnet XYM at the faucet. Just enter Alice’s account address. in my case it isTCVBFZFEVDL65PXJDXVAZ3OGSWR5YR6NYTMOPPI but when you run the code above you will generate different random addresses.
Once you have requested the funds they should be confirmed in Alice’s account within a minute. We can check this on the testnet explorer.
So we can see that Alice now has 10 XYM in her account. Now she can send funds to Bob and Carol in an aggregate transaction!
Setting up the transaction
First I say what mosaic ID I would like to transfer – in this case I enter the ID of testnet XYM but it could be any mosaic on testnet.
mosaic_id = 0x091F837E059AE13CNext we set up two transfer transactions bobTx and carolTx which will both be signed by Alice. All we need here are Alice’s public key and Bob and Carol’s account addresses. We send 1 XYM to Bob and 2 XYM to Carol. We also create a message with the string “test” which will be send to both recipients.
msg = 'test'
bobTx = facade.transaction_factory.create_embedded({
    'type': 'transfer',
    'signer_public_key': alicePubkey,
    'recipient_address': bobAddress,
    'mosaics': [(mosaic_id, 1000000)],
    'message': bytes(1) + msg.encode('utf8')
})
carolTx = facade.transaction_factory.create_embedded({
    'type': 'transfer',
    'signer_public_key': alicePubkey,
    'recipient_address': carolAddress,
    'mosaics': [(mosaic_id, 2000000)],
    'message': bytes(1) + msg.encode('utf8')
})
Create a Merkle hash
OK, here I am at the limit of my understanding but will attempt to explain! 😁 We need to create a Merkle hash which I believe will be used to store all transactions to be included in the block. As we are making multiple transactions we derive the hash of the aggregate transaction from each individual transaction hash. We need to do this as we are creating a complex transaction – if you want to make a simple transfer transaction from one account to another then please see this article.
Further reading for those that are interested: Merkle Trees and Ralph Merkle (thanks @gimre for picking me up on my spelling – and thanks for reading the blog!).
from symbolchain.core.sym.MerkleHashBuilder import MerkleHashBuilder
from symbolchain.core.CryptoTypes import Hash256
import sha3
hash_builder = MerkleHashBuilder()
hash_builder.update(Hash256(sha3.sha3_256(bobTx.serialize()).digest()))
hash_builder.update(Hash256(sha3.sha3_256(carolTx.serialize()).digest()))
merkle_hash = hash_builder.final()
Creating our aggregate transaction
Here we set a transaction deadline and have to import an extra module datetime. As explained in this article we have to calculate the deadline using the time that the testnet went live “1616694977” and as the deadline is in milliseconds we need to multiply the resulting value by 1000.
The aggregate transaction is signed by Alice and has a maxFee value of 1 XYM (1000000 microXYM). We provide the Merkle hash (merkle_hash) we just generated and include the two transactions that we set up previously bobTX and carolTx.
Then Alice signs the aggregate transactionaggregate.
import datetime
deadline = (int((datetime.datetime.today() + datetime.timedelta(hours=2)).timestamp()) - 1616694977) * 1000
aggregate = facade.transaction_factory.create({
    'type': 'aggregateComplete',
    'signer_public_key': alicePubkey,
    'fee': 1000000,
    'deadline': deadline,
    'transactions_hash': merkle_hash,
    'transactions': [bobTx,carolTx]
})
signature = facade.sign_transaction(aliceKeypair, aggregate)
aggregate.signature = signature.bytes
Announcing the transaction
Next we need to announce the transaction to the node. If successful we will receive a response of “202 Accepted”
from binascii import hexlify
payload = {"payload": hexlify(aggregate.serialize()).decode('utf8').upper()}
import json
json = json.dumps(payload)
headers = {'Content-type': 'application/json'}
import http.client
conn = http.client.HTTPConnection("sym-test-01.opening-line.jp",3000)
conn.request("PUT", "/transactions", json,headers)
response = conn.getresponse()
print(response.status, response.reason)
We see that the transaction was successful!
202 AcceptedWe can then verify the transaction has been confirmed. The code below generates a URL which will allow you to check the status on the node.
Verifying the transaction
hash = facade.hash_transaction(aggregate)
print('https://sym-test-01.opening-line.jp:3001/transactionStatus/' + str(hash))https://sym-test-01.opening-line.jp:3001/transactionStatus/2FBF58DF69EDB33C04CF68BB2ADAEBC9056FD03EB0038E1C14C5E9D2790EAF67
If you click the URL generated you will see that the transaction was successful:
{"group":"confirmed","code":"Success","hash":"2FBF58DF69EDB33C04CF68BB2ADAEBC9056FD03EB0038E1C14C5E9D2790EAF67","deadline":"10791276000","height":"278130"}We can also check this in the explorer and we see a visual representation of the transaction.
Also if you mouse over the the transfer icons it shows you the message and the amount sent to Bob and Carol.
OK so that is everything – I have made my first aggregate transaction on the Symbol blockchain! 🤩 As usual feel free to experiment, edit and expand. I have included my Jupyter Notebook here so that you can run the code yourself!
Edit: I have just finished writing this and seen a post by @nobu_kyutech, author of the previous Python examples we translated and it is on aggregate transactions! Please also check out his post as there are some subtle differences.
Thanks for reading! 😊
bobPrikey = PrivateKey.random()
bobKeypair = SymFacade.KeyPair(bobPrikey)
bobPubkey = bobKeypair.public_key
bobAddress = facade.network.public_key_to_address(bobPubkey)
print(str(bobAddress))TDX3FEYHRRGFFSXEWA5CL5XKFX2IKIQAIWVU6CAcarolPrikey = PrivateKey.random()
carolKeypair = SymFacade.KeyPair(carolPrikey)
carolPubkey = carolKeypair.public_key
carolAddress = facade.network.public_key_to_address(carolPubkey)
print(str(carolAddress))TB7XUKLOT4LDFMX5TCEMXEBGO3CIMML4MNINN5YFunding Alice’s account
We need to give Alice some funds as her account is empty and she wants to send some XYM to Bob and Carol. We can do this by requesting some testnet XYM at the faucet. Just enter Alice’s account address. in my case it isTCVBFZFEVDL65PXJDXVAZ3OGSWR5YR6NYTMOPPI but when you run the code above you will generate different random addresses.
Once you have requested the funds they should be confirmed in Alice’s account within a minute. We can check this on the testnet explorer.
So we can see that Alice now has 10 XYM in her account. Now she can send funds to Bob and Carol in an aggregate transaction!
Setting up the transaction
First I say what mosaic ID I would like to transfer – in this case I enter the ID of testnet XYM but it could be any mosaic on testnet.
mosaic_id = 0x091F837E059AE13CNext we set up two transfer transactions bobTx and carolTx which will both be signed by Alice. All we need here are Alice’s public key and Bob and Carol’s account addresses. We send 1 XYM to Bob and 2 XYM to Carol. We also create a message with the string “test” which will be send to both recipients.
msg = 'test'
bobTx = facade.transaction_factory.create_embedded({
    'type': 'transfer',
    'signer_public_key': alicePubkey,
    'recipient_address': bobAddress,
    'mosaics': [(mosaic_id, 1000000)],
    'message': bytes(1) + msg.encode('utf8')
})
carolTx = facade.transaction_factory.create_embedded({
    'type': 'transfer',
    'signer_public_key': alicePubkey,
    'recipient_address': carolAddress,
    'mosaics': [(mosaic_id, 2000000)],
    'message': bytes(1) + msg.encode('utf8')
})
Create a Merkle hash
OK, here I am at the limit of my understanding but will attempt to explain! 😁 We need to create a Merkle hash which I believe will be used to store all transactions to be included in the block. As we are making multiple transactions we derive the hash of the aggregate transaction from each individual transaction hash. We need to do this as we are creating a complex transaction – if you want to make a simple transfer transaction from one account to another then please see this article.
Further reading for those that are interested: Merkle Trees and Ralph Merkle (thanks @gimre for picking me up on my spelling – and thanks for reading the blog!).
from symbolchain.core.sym.MerkleHashBuilder import MerkleHashBuilder
from symbolchain.core.CryptoTypes import Hash256
import sha3
hash_builder = MerkleHashBuilder()
hash_builder.update(Hash256(sha3.sha3_256(bobTx.serialize()).digest()))
hash_builder.update(Hash256(sha3.sha3_256(carolTx.serialize()).digest()))
merkle_hash = hash_builder.final()
Creating our aggregate transaction
Here we set a transaction deadline and have to import an extra module datetime. As explained in this article we have to calculate the deadline using the time that the testnet went live “1616694977” and as the deadline is in milliseconds we need to multiply the resulting value by 1000.
The aggregate transaction is signed by Alice and has a maxFee value of 1 XYM (1000000 microXYM). We provide the Merkle hash (merkle_hash) we just generated and include the two transactions that we set up previously bobTX and carolTx.
Then Alice signs the aggregate transactionaggregate.
import datetime
deadline = (int((datetime.datetime.today() + datetime.timedelta(hours=2)).timestamp()) - 1616694977) * 1000
aggregate = facade.transaction_factory.create({
    'type': 'aggregateComplete',
    'signer_public_key': alicePubkey,
    'fee': 1000000,
    'deadline': deadline,
    'transactions_hash': merkle_hash,
    'transactions': [bobTx,carolTx]
})
signature = facade.sign_transaction(aliceKeypair, aggregate)
aggregate.signature = signature.bytes
Announcing the transaction
Next we need to announce the transaction to the node. If successful we will receive a response of “202 Accepted”
from binascii import hexlify
payload = {"payload": hexlify(aggregate.serialize()).decode('utf8').upper()}
import json
json = json.dumps(payload)
headers = {'Content-type': 'application/json'}
import http.client
conn = http.client.HTTPConnection("sym-test-01.opening-line.jp",3000)
conn.request("PUT", "/transactions", json,headers)
response = conn.getresponse()
print(response.status, response.reason)
We see that the transaction was successful!
202 AcceptedWe can then verify the transaction has been confirmed. The code below generates a URL which will allow you to check the status on the node.
Verifying the transaction
hash = facade.hash_transaction(aggregate)
print('https://sym-test-01.opening-line.jp:3001/transactionStatus/' + str(hash))https://sym-test-01.opening-line.jp:3001/transactionStatus/2FBF58DF69EDB33C04CF68BB2ADAEBC9056FD03EB0038E1C14C5E9D2790EAF67
If you click the URL generated you will see that the transaction was successful:
{"group":"confirmed","code":"Success","hash":"2FBF58DF69EDB33C04CF68BB2ADAEBC9056FD03EB0038E1C14C5E9D2790EAF67","deadline":"10791276000","height":"278130"}We can also check this in the explorer and we see a visual representation of the transaction.
Also if you mouse over the the transfer icons it shows you the message and the amount sent to Bob and Carol.
OK so that is everything – I have made my first aggregate transaction on the Symbol blockchain! 🤩 As usual feel free to experiment, edit and expand. I have included my Jupyter Notebook here so that you can run the code yourself!
Edit: I have just finished writing this and seen a post by @nobu_kyutech, author of the previous Python examples we translated and it is on aggregate transactions! Please also check out his post as there are some subtle differences.
Thanks for reading! 😊
Next we create Bob and Carol’s account in the same way – again I will just print the account addresses that we have generated.bobPrikey = PrivateKey.random()
bobKeypair = SymFacade.KeyPair(bobPrikey)
bobPubkey = bobKeypair.public_key
bobAddress = facade.network.public_key_to_address(bobPubkey)
print(str(bobAddress))TDX3FEYHRRGFFSXEWA5CL5XKFX2IKIQAIWVU6CAcarolPrikey = PrivateKey.random()
carolKeypair = SymFacade.KeyPair(carolPrikey)
carolPubkey = carolKeypair.public_key
carolAddress = facade.network.public_key_to_address(carolPubkey)
print(str(carolAddress))TB7XUKLOT4LDFMX5TCEMXEBGO3CIMML4MNINN5YFunding Alice’s account
We need to give Alice some funds as her account is empty and she wants to send some XYM to Bob and Carol. We can do this by requesting some testnet XYM at the faucet. Just enter Alice’s account address. in my case it isTCVBFZFEVDL65PXJDXVAZ3OGSWR5YR6NYTMOPPI but when you run the code above you will generate different random addresses.
Once you have requested the funds they should be confirmed in Alice’s account within a minute. We can check this on the testnet explorer.
So we can see that Alice now has 10 XYM in her account. Now she can send funds to Bob and Carol in an aggregate transaction!
Setting up the transaction
First I say what mosaic ID I would like to transfer – in this case I enter the ID of testnet XYM but it could be any mosaic on testnet.
mosaic_id = 0x091F837E059AE13CNext we set up two transfer transactions bobTx and carolTx which will both be signed by Alice. All we need here are Alice’s public key and Bob and Carol’s account addresses. We send 1 XYM to Bob and 2 XYM to Carol. We also create a message with the string “test” which will be send to both recipients.
msg = 'test'
bobTx = facade.transaction_factory.create_embedded({
'type': 'transfer',
'signer_public_key': alicePubkey,
'recipient_address': bobAddress,
'mosaics': [(mosaic_id, 1000000)],
'message': bytes(1) + msg.encode('utf8')
})
carolTx = facade.transaction_factory.create_embedded({
'type': 'transfer',
'signer_public_key': alicePubkey,
'recipient_address': carolAddress,
'mosaics': [(mosaic_id, 2000000)],
'message': bytes(1) + msg.encode('utf8')
})Create a Merkle hash
OK, here I am at the limit of my understanding but will attempt to explain! 😁 We need to create a Merkle hash which I believe will be used to store all transactions to be included in the block. As we are making multiple transactions we derive the hash of the aggregate transaction from each individual transaction hash. We need to do this as we are creating a complex transaction – if you want to make a simple transfer transaction from one account to another then please see this article.
Further reading for those that are interested: Merkle Trees and Ralph Merkle (thanks @gimre for picking me up on my spelling – and thanks for reading the blog!).
from symbolchain.core.sym.MerkleHashBuilder import MerkleHashBuilder
from symbolchain.core.CryptoTypes import Hash256
import sha3
hash_builder = MerkleHashBuilder()
hash_builder.update(Hash256(sha3.sha3_256(bobTx.serialize()).digest()))
hash_builder.update(Hash256(sha3.sha3_256(carolTx.serialize()).digest()))
merkle_hash = hash_builder.final()Creating our aggregate transaction
Here we set a transaction deadline and have to import an extra module datetime. As explained in this article we have to calculate the deadline using the time that the testnet went live “1616694977” and as the deadline is in milliseconds we need to multiply the resulting value by 1000.
The aggregate transaction is signed by Alice and has a maxFee value of 1 XYM (1000000 microXYM). We provide the Merkle hash (merkle_hash) we just generated and include the two transactions that we set up previously bobTX and carolTx.
Then Alice signs the aggregate transactionaggregate.
import datetime
deadline = (int((datetime.datetime.today() + datetime.timedelta(hours=2)).timestamp()) - 1616694977) * 1000
aggregate = facade.transaction_factory.create({
'type': 'aggregateComplete',
'signer_public_key': alicePubkey,
'fee': 1000000,
'deadline': deadline,
'transactions_hash': merkle_hash,
'transactions': [bobTx,carolTx]
})
signature = facade.sign_transaction(aliceKeypair, aggregate)
aggregate.signature = signature.bytesAnnouncing the transaction
Next we need to announce the transaction to the node. If successful we will receive a response of “202 Accepted”
from binascii import hexlify
payload = {"payload": hexlify(aggregate.serialize()).decode('utf8').upper()}
import json
json = json.dumps(payload)
headers = {'Content-type': 'application/json'}
import http.client
conn = http.client.HTTPConnection("sym-test-01.opening-line.jp",3000)
conn.request("PUT", "/transactions", json,headers)
response = conn.getresponse()
print(response.status, response.reason)We see that the transaction was successful!
202 AcceptedWe can then verify the transaction has been confirmed. The code below generates a URL which will allow you to check the status on the node.
Verifying the transaction
hash = facade.hash_transaction(aggregate)
print('https://sym-test-01.opening-line.jp:3001/transactionStatus/' + str(hash))https://sym-test-01.opening-line.jp:3001/transactionStatus/2FBF58DF69EDB33C04CF68BB2ADAEBC9056FD03EB0038E1C14C5E9D2790EAF67
If you click the URL generated you will see that the transaction was successful:
{"group":"confirmed","code":"Success","hash":"2FBF58DF69EDB33C04CF68BB2ADAEBC9056FD03EB0038E1C14C5E9D2790EAF67","deadline":"10791276000","height":"278130"}We can also check this in the explorer and we see a visual representation of the transaction.
Also if you mouse over the the transfer icons it shows you the message and the amount sent to Bob and Carol.
OK so that is everything – I have made my first aggregate transaction on the Symbol blockchain! 🤩 As usual feel free to experiment, edit and expand. I have included my Jupyter Notebook here so that you can run the code yourself!
Edit: I have just finished writing this and seen a post by @nobu_kyutech, author of the previous Python examples we translated and it is on aggregate transactions! Please also check out his post as there are some subtle differences.
Thanks for reading! 😊
Next we create Bob and Carol’s account in the same way – again I will just print the account addresses that we have generated.
bobPrikey = PrivateKey.random()
bobKeypair = SymFacade.KeyPair(bobPrikey)
bobPubkey = bobKeypair.public_key
bobAddress = facade.network.public_key_to_address(bobPubkey)
print(str(bobAddress))TDX3FEYHRRGFFSXEWA5CL5XKFX2IKIQAIWVU6CAcarolPrikey = PrivateKey.random()
carolKeypair = SymFacade.KeyPair(carolPrikey)
carolPubkey = carolKeypair.public_key
carolAddress = facade.network.public_key_to_address(carolPubkey)
print(str(carolAddress))TB7XUKLOT4LDFMX5TCEMXEBGO3CIMML4MNINN5YFunding Alice’s account
We need to give Alice some funds as her account is empty and she wants to send some XYM to Bob and Carol. We can do this by requesting some testnet XYM at the faucet. Just enter Alice’s account address. in my case it isTCVBFZFEVDL65PXJDXVAZ3OGSWR5YR6NYTMOPPI but when you run the code above you will generate different random addresses.
Once you have requested the funds they should be confirmed in Alice’s account within a minute. We can check this on the testnet explorer.
So we can see that Alice now has 10 XYM in her account. Now she can send funds to Bob and Carol in an aggregate transaction!
Setting up the transaction
First I say what mosaic ID I would like to transfer – in this case I enter the ID of testnet XYM but it could be any mosaic on testnet.
mosaic_id = 0x091F837E059AE13CNext we set up two transfer transactions bobTx and carolTx which will both be signed by Alice. All we need here are Alice’s public key and Bob and Carol’s account addresses. We send 1 XYM to Bob and 2 XYM to Carol. We also create a message with the string “test” which will be send to both recipients.
msg = 'test'
bobTx = facade.transaction_factory.create_embedded({
    'type': 'transfer',
    'signer_public_key': alicePubkey,
    'recipient_address': bobAddress,
    'mosaics': [(mosaic_id, 1000000)],
    'message': bytes(1) + msg.encode('utf8')
})
carolTx = facade.transaction_factory.create_embedded({
    'type': 'transfer',
    'signer_public_key': alicePubkey,
    'recipient_address': carolAddress,
    'mosaics': [(mosaic_id, 2000000)],
    'message': bytes(1) + msg.encode('utf8')
})
Create a Merkle hash
OK, here I am at the limit of my understanding but will attempt to explain! 😁 We need to create a Merkle hash which I believe will be used to store all transactions to be included in the block. As we are making multiple transactions we derive the hash of the aggregate transaction from each individual transaction hash. We need to do this as we are creating a complex transaction – if you want to make a simple transfer transaction from one account to another then please see this article.
Further reading for those that are interested: Merkle Trees and Ralph Merkle (thanks @gimre for picking me up on my spelling – and thanks for reading the blog!).
from symbolchain.core.sym.MerkleHashBuilder import MerkleHashBuilder
from symbolchain.core.CryptoTypes import Hash256
import sha3
hash_builder = MerkleHashBuilder()
hash_builder.update(Hash256(sha3.sha3_256(bobTx.serialize()).digest()))
hash_builder.update(Hash256(sha3.sha3_256(carolTx.serialize()).digest()))
merkle_hash = hash_builder.final()
Creating our aggregate transaction
Here we set a transaction deadline and have to import an extra module datetime. As explained in this article we have to calculate the deadline using the time that the testnet went live “1616694977” and as the deadline is in milliseconds we need to multiply the resulting value by 1000.
The aggregate transaction is signed by Alice and has a maxFee value of 1 XYM (1000000 microXYM). We provide the Merkle hash (merkle_hash) we just generated and include the two transactions that we set up previously bobTX and carolTx.
Then Alice signs the aggregate transactionaggregate.
import datetime
deadline = (int((datetime.datetime.today() + datetime.timedelta(hours=2)).timestamp()) - 1616694977) * 1000
aggregate = facade.transaction_factory.create({
    'type': 'aggregateComplete',
    'signer_public_key': alicePubkey,
    'fee': 1000000,
    'deadline': deadline,
    'transactions_hash': merkle_hash,
    'transactions': [bobTx,carolTx]
})
signature = facade.sign_transaction(aliceKeypair, aggregate)
aggregate.signature = signature.bytes
Announcing the transaction
Next we need to announce the transaction to the node. If successful we will receive a response of “202 Accepted”
from binascii import hexlify
payload = {"payload": hexlify(aggregate.serialize()).decode('utf8').upper()}
import json
json = json.dumps(payload)
headers = {'Content-type': 'application/json'}
import http.client
conn = http.client.HTTPConnection("sym-test-01.opening-line.jp",3000)
conn.request("PUT", "/transactions", json,headers)
response = conn.getresponse()
print(response.status, response.reason)
We see that the transaction was successful!
202 AcceptedWe can then verify the transaction has been confirmed. The code below generates a URL which will allow you to check the status on the node.
Verifying the transaction
hash = facade.hash_transaction(aggregate)
print('https://sym-test-01.opening-line.jp:3001/transactionStatus/' + str(hash))https://sym-test-01.opening-line.jp:3001/transactionStatus/2FBF58DF69EDB33C04CF68BB2ADAEBC9056FD03EB0038E1C14C5E9D2790EAF67
If you click the URL generated you will see that the transaction was successful:
{"group":"confirmed","code":"Success","hash":"2FBF58DF69EDB33C04CF68BB2ADAEBC9056FD03EB0038E1C14C5E9D2790EAF67","deadline":"10791276000","height":"278130"}We can also check this in the explorer and we see a visual representation of the transaction.
Also if you mouse over the the transfer icons it shows you the message and the amount sent to Bob and Carol.
OK so that is everything – I have made my first aggregate transaction on the Symbol blockchain! 🤩 As usual feel free to experiment, edit and expand. I have included my Jupyter Notebook here so that you can run the code yourself!
Edit: I have just finished writing this and seen a post by @nobu_kyutech, author of the previous Python examples we translated and it is on aggregate transactions! Please also check out his post as there are some subtle differences.
Thanks for reading! 😊
Here I create Alice’s account and will print the address as I will need to know this in order to fund it from the faucet later.alicePrikey = PrivateKey.random()
aliceKeypair = SymFacade.KeyPair(alicePrikey)
alicePubkey = aliceKeypair.public_key
aliceAddress = facade.network.public_key_to_address(alicePubkey)
print(str(aliceAddress))TCVBFZFEVDL65PXJDXVAZ3OGSWR5YR6NYTMOPPINext we create Bob and Carol’s account in the same way – again I will just print the account addresses that we have generated.
bobPrikey = PrivateKey.random()
bobKeypair = SymFacade.KeyPair(bobPrikey)
bobPubkey = bobKeypair.public_key
bobAddress = facade.network.public_key_to_address(bobPubkey)
print(str(bobAddress))TDX3FEYHRRGFFSXEWA5CL5XKFX2IKIQAIWVU6CAcarolPrikey = PrivateKey.random()
carolKeypair = SymFacade.KeyPair(carolPrikey)
carolPubkey = carolKeypair.public_key
carolAddress = facade.network.public_key_to_address(carolPubkey)
print(str(carolAddress))TB7XUKLOT4LDFMX5TCEMXEBGO3CIMML4MNINN5YFunding Alice’s account
We need to give Alice some funds as her account is empty and she wants to send some XYM to Bob and Carol. We can do this by requesting some testnet XYM at the faucet. Just enter Alice’s account address. in my case it isTCVBFZFEVDL65PXJDXVAZ3OGSWR5YR6NYTMOPPI but when you run the code above you will generate different random addresses.
Once you have requested the funds they should be confirmed in Alice’s account within a minute. We can check this on the testnet explorer.
So we can see that Alice now has 10 XYM in her account. Now she can send funds to Bob and Carol in an aggregate transaction!
Setting up the transaction
First I say what mosaic ID I would like to transfer – in this case I enter the ID of testnet XYM but it could be any mosaic on testnet.
mosaic_id = 0x091F837E059AE13CNext we set up two transfer transactions bobTx and carolTx which will both be signed by Alice. All we need here are Alice’s public key and Bob and Carol’s account addresses. We send 1 XYM to Bob and 2 XYM to Carol. We also create a message with the string “test” which will be send to both recipients.
msg = 'test'
bobTx = facade.transaction_factory.create_embedded({
    'type': 'transfer',
    'signer_public_key': alicePubkey,
    'recipient_address': bobAddress,
    'mosaics': [(mosaic_id, 1000000)],
    'message': bytes(1) + msg.encode('utf8')
})
carolTx = facade.transaction_factory.create_embedded({
    'type': 'transfer',
    'signer_public_key': alicePubkey,
    'recipient_address': carolAddress,
    'mosaics': [(mosaic_id, 2000000)],
    'message': bytes(1) + msg.encode('utf8')
})
Create a Merkle hash
OK, here I am at the limit of my understanding but will attempt to explain! 😁 We need to create a Merkle hash which I believe will be used to store all transactions to be included in the block. As we are making multiple transactions we derive the hash of the aggregate transaction from each individual transaction hash. We need to do this as we are creating a complex transaction – if you want to make a simple transfer transaction from one account to another then please see this article.
Further reading for those that are interested: Merkle Trees and Ralph Merkle (thanks @gimre for picking me up on my spelling – and thanks for reading the blog!).
from symbolchain.core.sym.MerkleHashBuilder import MerkleHashBuilder
from symbolchain.core.CryptoTypes import Hash256
import sha3
hash_builder = MerkleHashBuilder()
hash_builder.update(Hash256(sha3.sha3_256(bobTx.serialize()).digest()))
hash_builder.update(Hash256(sha3.sha3_256(carolTx.serialize()).digest()))
merkle_hash = hash_builder.final()
Creating our aggregate transaction
Here we set a transaction deadline and have to import an extra module datetime. As explained in this article we have to calculate the deadline using the time that the testnet went live “1616694977” and as the deadline is in milliseconds we need to multiply the resulting value by 1000.
The aggregate transaction is signed by Alice and has a maxFee value of 1 XYM (1000000 microXYM). We provide the Merkle hash (merkle_hash) we just generated and include the two transactions that we set up previously bobTX and carolTx.
Then Alice signs the aggregate transactionaggregate.
import datetime
deadline = (int((datetime.datetime.today() + datetime.timedelta(hours=2)).timestamp()) - 1616694977) * 1000
aggregate = facade.transaction_factory.create({
    'type': 'aggregateComplete',
    'signer_public_key': alicePubkey,
    'fee': 1000000,
    'deadline': deadline,
    'transactions_hash': merkle_hash,
    'transactions': [bobTx,carolTx]
})
signature = facade.sign_transaction(aliceKeypair, aggregate)
aggregate.signature = signature.bytes
Announcing the transaction
Next we need to announce the transaction to the node. If successful we will receive a response of “202 Accepted”
from binascii import hexlify
payload = {"payload": hexlify(aggregate.serialize()).decode('utf8').upper()}
import json
json = json.dumps(payload)
headers = {'Content-type': 'application/json'}
import http.client
conn = http.client.HTTPConnection("sym-test-01.opening-line.jp",3000)
conn.request("PUT", "/transactions", json,headers)
response = conn.getresponse()
print(response.status, response.reason)
We see that the transaction was successful!
202 AcceptedWe can then verify the transaction has been confirmed. The code below generates a URL which will allow you to check the status on the node.
Verifying the transaction
hash = facade.hash_transaction(aggregate)
print('https://sym-test-01.opening-line.jp:3001/transactionStatus/' + str(hash))https://sym-test-01.opening-line.jp:3001/transactionStatus/2FBF58DF69EDB33C04CF68BB2ADAEBC9056FD03EB0038E1C14C5E9D2790EAF67
If you click the URL generated you will see that the transaction was successful:
{"group":"confirmed","code":"Success","hash":"2FBF58DF69EDB33C04CF68BB2ADAEBC9056FD03EB0038E1C14C5E9D2790EAF67","deadline":"10791276000","height":"278130"}We can also check this in the explorer and we see a visual representation of the transaction.
Also if you mouse over the the transfer icons it shows you the message and the amount sent to Bob and Carol.
OK so that is everything – I have made my first aggregate transaction on the Symbol blockchain! 🤩 As usual feel free to experiment, edit and expand. I have included my Jupyter Notebook here so that you can run the code yourself!
Edit: I have just finished writing this and seen a post by @nobu_kyutech, author of the previous Python examples we translated and it is on aggregate transactions! Please also check out his post as there are some subtle differences.
Thanks for reading! 😊
Here I create Alice’s account and will print the address as I will need to know this in order to fund it from the faucet later.
alicePrikey = PrivateKey.random()
aliceKeypair = SymFacade.KeyPair(alicePrikey)
alicePubkey = aliceKeypair.public_key
aliceAddress = facade.network.public_key_to_address(alicePubkey)
print(str(aliceAddress))TCVBFZFEVDL65PXJDXVAZ3OGSWR5YR6NYTMOPPINext we create Bob and Carol’s account in the same way – again I will just print the account addresses that we have generated.
bobPrikey = PrivateKey.random()
bobKeypair = SymFacade.KeyPair(bobPrikey)
bobPubkey = bobKeypair.public_key
bobAddress = facade.network.public_key_to_address(bobPubkey)
print(str(bobAddress))TDX3FEYHRRGFFSXEWA5CL5XKFX2IKIQAIWVU6CAcarolPrikey = PrivateKey.random()
carolKeypair = SymFacade.KeyPair(carolPrikey)
carolPubkey = carolKeypair.public_key
carolAddress = facade.network.public_key_to_address(carolPubkey)
print(str(carolAddress))TB7XUKLOT4LDFMX5TCEMXEBGO3CIMML4MNINN5YFunding Alice’s account
We need to give Alice some funds as her account is empty and she wants to send some XYM to Bob and Carol. We can do this by requesting some testnet XYM at the faucet. Just enter Alice’s account address. in my case it isTCVBFZFEVDL65PXJDXVAZ3OGSWR5YR6NYTMOPPI but when you run the code above you will generate different random addresses.
Once you have requested the funds they should be confirmed in Alice’s account within a minute. We can check this on the testnet explorer.
So we can see that Alice now has 10 XYM in her account. Now she can send funds to Bob and Carol in an aggregate transaction!
Setting up the transaction
First I say what mosaic ID I would like to transfer – in this case I enter the ID of testnet XYM but it could be any mosaic on testnet.
mosaic_id = 0x091F837E059AE13CNext we set up two transfer transactions bobTx and carolTx which will both be signed by Alice. All we need here are Alice’s public key and Bob and Carol’s account addresses. We send 1 XYM to Bob and 2 XYM to Carol. We also create a message with the string “test” which will be send to both recipients.
msg = 'test'
bobTx = facade.transaction_factory.create_embedded({
    'type': 'transfer',
    'signer_public_key': alicePubkey,
    'recipient_address': bobAddress,
    'mosaics': [(mosaic_id, 1000000)],
    'message': bytes(1) + msg.encode('utf8')
})
carolTx = facade.transaction_factory.create_embedded({
    'type': 'transfer',
    'signer_public_key': alicePubkey,
    'recipient_address': carolAddress,
    'mosaics': [(mosaic_id, 2000000)],
    'message': bytes(1) + msg.encode('utf8')
})
Create a Merkle hash
OK, here I am at the limit of my understanding but will attempt to explain! 😁 We need to create a Merkle hash which I believe will be used to store all transactions to be included in the block. As we are making multiple transactions we derive the hash of the aggregate transaction from each individual transaction hash. We need to do this as we are creating a complex transaction – if you want to make a simple transfer transaction from one account to another then please see this article.
Further reading for those that are interested: Merkle Trees and Ralph Merkle (thanks @gimre for picking me up on my spelling – and thanks for reading the blog!).
from symbolchain.core.sym.MerkleHashBuilder import MerkleHashBuilder
from symbolchain.core.CryptoTypes import Hash256
import sha3
hash_builder = MerkleHashBuilder()
hash_builder.update(Hash256(sha3.sha3_256(bobTx.serialize()).digest()))
hash_builder.update(Hash256(sha3.sha3_256(carolTx.serialize()).digest()))
merkle_hash = hash_builder.final()
Creating our aggregate transaction
Here we set a transaction deadline and have to import an extra module datetime. As explained in this article we have to calculate the deadline using the time that the testnet went live “1616694977” and as the deadline is in milliseconds we need to multiply the resulting value by 1000.
The aggregate transaction is signed by Alice and has a maxFee value of 1 XYM (1000000 microXYM). We provide the Merkle hash (merkle_hash) we just generated and include the two transactions that we set up previously bobTX and carolTx.
Then Alice signs the aggregate transactionaggregate.
import datetime
deadline = (int((datetime.datetime.today() + datetime.timedelta(hours=2)).timestamp()) - 1616694977) * 1000
aggregate = facade.transaction_factory.create({
    'type': 'aggregateComplete',
    'signer_public_key': alicePubkey,
    'fee': 1000000,
    'deadline': deadline,
    'transactions_hash': merkle_hash,
    'transactions': [bobTx,carolTx]
})
signature = facade.sign_transaction(aliceKeypair, aggregate)
aggregate.signature = signature.bytes
Announcing the transaction
Next we need to announce the transaction to the node. If successful we will receive a response of “202 Accepted”
from binascii import hexlify
payload = {"payload": hexlify(aggregate.serialize()).decode('utf8').upper()}
import json
json = json.dumps(payload)
headers = {'Content-type': 'application/json'}
import http.client
conn = http.client.HTTPConnection("sym-test-01.opening-line.jp",3000)
conn.request("PUT", "/transactions", json,headers)
response = conn.getresponse()
print(response.status, response.reason)
We see that the transaction was successful!
202 AcceptedWe can then verify the transaction has been confirmed. The code below generates a URL which will allow you to check the status on the node.
Verifying the transaction
hash = facade.hash_transaction(aggregate)
print('https://sym-test-01.opening-line.jp:3001/transactionStatus/' + str(hash))https://sym-test-01.opening-line.jp:3001/transactionStatus/2FBF58DF69EDB33C04CF68BB2ADAEBC9056FD03EB0038E1C14C5E9D2790EAF67
If you click the URL generated you will see that the transaction was successful:
{"group":"confirmed","code":"Success","hash":"2FBF58DF69EDB33C04CF68BB2ADAEBC9056FD03EB0038E1C14C5E9D2790EAF67","deadline":"10791276000","height":"278130"}We can also check this in the explorer and we see a visual representation of the transaction.
Also if you mouse over the the transfer icons it shows you the message and the amount sent to Bob and Carol.
OK so that is everything – I have made my first aggregate transaction on the Symbol blockchain! 🤩 As usual feel free to experiment, edit and expand. I have included my Jupyter Notebook here so that you can run the code yourself!
Edit: I have just finished writing this and seen a post by @nobu_kyutech, author of the previous Python examples we translated and it is on aggregate transactions! Please also check out his post as there are some subtle differences.
Thanks for reading! 😊
I’m a Symbol and NEM enthusiast and run this blog to try to grow awareness of the platform in the English-speaking world. If you have any Symbol news you would like me to report on or you have an article that you would like to publish then please let me know!
Sorry, the comment form is closed at this time.