

03 Aug Aggregate transactions in Python – part 3
This guide is translated from the original Qiita article written by nem_takanobu aka @xembook
In our last article, we described how to create an aggregate transaction with transfers from multiple accounts. The previous example required some offline processing and signing of transactions. In this article, we will show how to set up a transaction that will send funds from multiple accounts using an aggregate bonded transaction meaning that the entire transaction will be conducted on-chain.
What are aggregate bonded transactions?
An aggregate bonded transaction is a transaction that requires multiple accounts to sign. One account can set up the transaction, sign it and announce it to the network but cosigners are required to approve it within a specified deadline. After the partial transaction is announced the cosignatories will receive the transaction to sign with their own private keys. Once all cosignatories have signed, the transaction can be executed.
In our example, Alice will create an aggregate bonded transaction which will be sent to Bob for his signature.
The setup
As usual, we will be using the Symbol Python SDK and we will need to import the relevant modules.
from binascii import unhexlify
from symbolchain.core.CryptoTypes import PrivateKey
from symbolchain.core.sym.KeyPair import KeyPair
from symbolchain.core.facade.SymFacade import SymFacade

facade = SymFacade('public_test')
We will set up a new account for Alice. in @xembook‘s example he uses an existing private key for Alice but here I have set up a fresh account TD4TZNU5GX3HXYTXBML3ZGWOAUKYF7CQ2KZHVEA and will fund the account using the Symbol testnet faucet – we just need to ask for ~15 XYM, this will cover the transaction fees and the 10 XYM deposit for the aggregate bonded transaction and we will have a little leftover just for good measure.
alicePrikey = PrivateKey.random()
aliceKeypair = SymFacade.KeyPair(alicePrikey)
alicePubkey = aliceKeypair.public_key
aliceAddress = facade.network.public_key_to_address(alicePubkey)

print(str(aliceAddress))TD4TZNU5GX3HXYTXBML3ZGWOAUKYF7CQ2KZHVEAFor this exercise, I am using an existing testnet account TADOARQHTWFBWQMVMWQ244E3Y2KPB3BONPHSQ5Y which I set up for a previous post about mosaics and namespaces. I will be signing the aggregate bonded transaction in the Symbol wallet so make sure that you have a wallet set up and enter the address and public key in place of mine below! I don’t want to get spammed with a load of aggregate transactions! 😁 FYI there is a 10 XYM fee for sending an aggregate transaction for this very reason. If the hashlock expires without a signature then you lose your 10XYM and it goes to whoever harvests the block when the lock expires.
# This time I am using an existing testnet account you should update with your own details
# After you have set up a new testnet address in the Symbol wallet.
from symbolchain.core.CryptoTypes import PublicKey
bobPubkey = PublicKey(unhexlify("104A3B4C7C6EF884FC823111113962213AE143F7382B066A33FA8A140BC35726"))
bobAddress = SymFacade.Address("TADOARQHTWFBWQMVMWQ244E3Y2KPB3BONPHSQ5Y")
As you can see I have entered my address and public key for the account. These are both public and as long as Alice knows what your address (or public key) is, she can initiate the transaction. If you are doing this exercise and don’t know what your public key is then you can check it on the testnet explorer – just search for your account address.
Setting up the transaction
This is a similar setup to what we have discussed before but in this case, we are setting the aggregate type toaggregateBonded. We are also changing the transaction setup so that Alice is only sending a message to Bob asking him for some money, Bob will send back 100 XYM with a message should he decide to sign the transaction.
mosaic_id = 0x091F837E059AE13C

msgA = 'Bob I need some XYM!'
msgB = 'Here you go Alice - have 100 XYM! :)'

bobTx = facade.transaction_factory.create_embedded({
    'type': 'transfer',
    'signer_public_key': bobPubkey,
    'recipient_address': aliceAddress,
    'mosaics': [(mosaic_id, 100000000)],
    'message': bytes(1) + msgB.encode('utf8')
})

aliceTx = facade.transaction_factory.create_embedded({
    'type': 'transfer',
    'signer_public_key': alicePubkey,
    'recipient_address': bobAddress,
    'message': bytes(1) + msgA.encode('utf8')
})

from symbolchain.core.sym.MerkleHashBuilder import MerkleHashBuilder
from symbolchain.core.CryptoTypes import Hash256
import sha3

hash_builder = MerkleHashBuilder()
hash_builder.update(Hash256(sha3.sha3_256(aliceTx.serialize()).digest()))
hash_builder.update(Hash256(sha3.sha3_256(bobTx.serialize()).digest()))
merkle_hash = hash_builder.final()

import datetime
deadline = (int((datetime.datetime.today() + datetime.timedelta(hours=2)).timestamp()) - 1616694977) * 1000

aggregate = facade.transaction_factory.create({
    'type': 'aggregateBonded',
    'signer_public_key': alicePubkey,
    'fee': 1000000,
    'deadline': deadline,
    'transactions_hash': merkle_hash,
    'transactions': [aliceTx,bobTx]
})

signature = facade.sign_transaction(aliceKeypair, aggregate)
aggregate.signature = signature.bytes
Creating and announcing the hashlock transaction
Before we announce the transaction we need to create and announce a HashLockTransaction. This locks funds as a deposit for a specified number of blocks (duration) and is required before we announce the aggregate bonded transaction to the network. As you will see we have to include a deposit of 10 XYM in the mosaic field of the transaction. This will be returned to Alice’s account if Bob signs the transaction.
from binascii import hexlify
hash = facade.hash_transaction(aggregate).bytes
# Here we are creating a new hashlock transaction
# We set the type to hashLock and Alice provides her public key
# We have to include a 10 XYM deposit for the transaction
hashLockTx = facade.transaction_factory.create({
'type': 'hashLock',
'signer_public_key': alicePubkey,
'fee': 1000000,
'deadline': deadline,
'hash': hash,
'mosaic': (0x091F837E059AE13C, 10000000),
'duration': 480
})
# Alice then signs the hashlock transaction
hashLockSignature = facade.sign_transaction(aliceKeypair, hashLockTx)
hashLockTx.signature = hashLockSignature.bytes
# And we announce it to the node
import json
import http.client
headers = {'Content-type': 'application/json'}
conn = http.client.HTTPConnection("sym-test-01.opening-line.jp",3000)
hashLockPayload = {"payload": hexlify(hashLockTx.serialize()).decode('utf8').upper()}
conn.request("PUT", "/transactions", json.dumps(hashLockPayload),headers)
response = conn.getresponse()
print(response.status, response.reason)#Get URL to check the transaction has completed:
print('http://sym-test-01.opening-line.jp:3000/transactionStatus/' + str(facade.hash_transaction(hashLockTx)))After running this code you should get a “202 Accepted” response from the node.
And when you click on the URL you should see "group":"confirmed","code":"Success" if the transaction was successfully validated.
ANNOUNCING THE AGGREGATE BONDED TRANSACTION
This is a partial transaction (as only Alice has signed) so the endpoint is:
/transactions/partialpayload = {"payload": hexlify(aggregate.serialize()).decode('utf8').upper()}
conn = http.client.HTTPConnection("sym-test-01.opening-line.jp",3000)
conn.request("PUT", "/transactions/partial", json.dumps(payload),headers)
response = conn.getresponse()
print(response.status, response.reason)
hash = facade.hash_transaction(aggregate)
print('http://sym-test-01.opening-line.jp:3000/transactionStatus/' + str(hash))Again you should get a 202 response from the node and can check the transaction status in the URL generated, in my case review here
{"group":"confirmed","code":"Success","hash":"62E9177BD0AD568D450C9AF4FA0134FB46EE1411A37C7135A6E3BB73FB85DFD8","deadline":"11230771000","height":"290527"}Bob’s signature
So Alice has successfully created and announced both the hash lock and the aggregate bonded transaction. If Bob now logs into his Symbol wallet he will see the transaction sitting there waiting for him to sign (or not if he doesn’t like Alice’s request!).
Sure enough, when I look at my wallet I can see a new aggregate bonded transaction waiting for me to sign, you can see that it has the status “partial”. It has been signed by Alice but not by me.
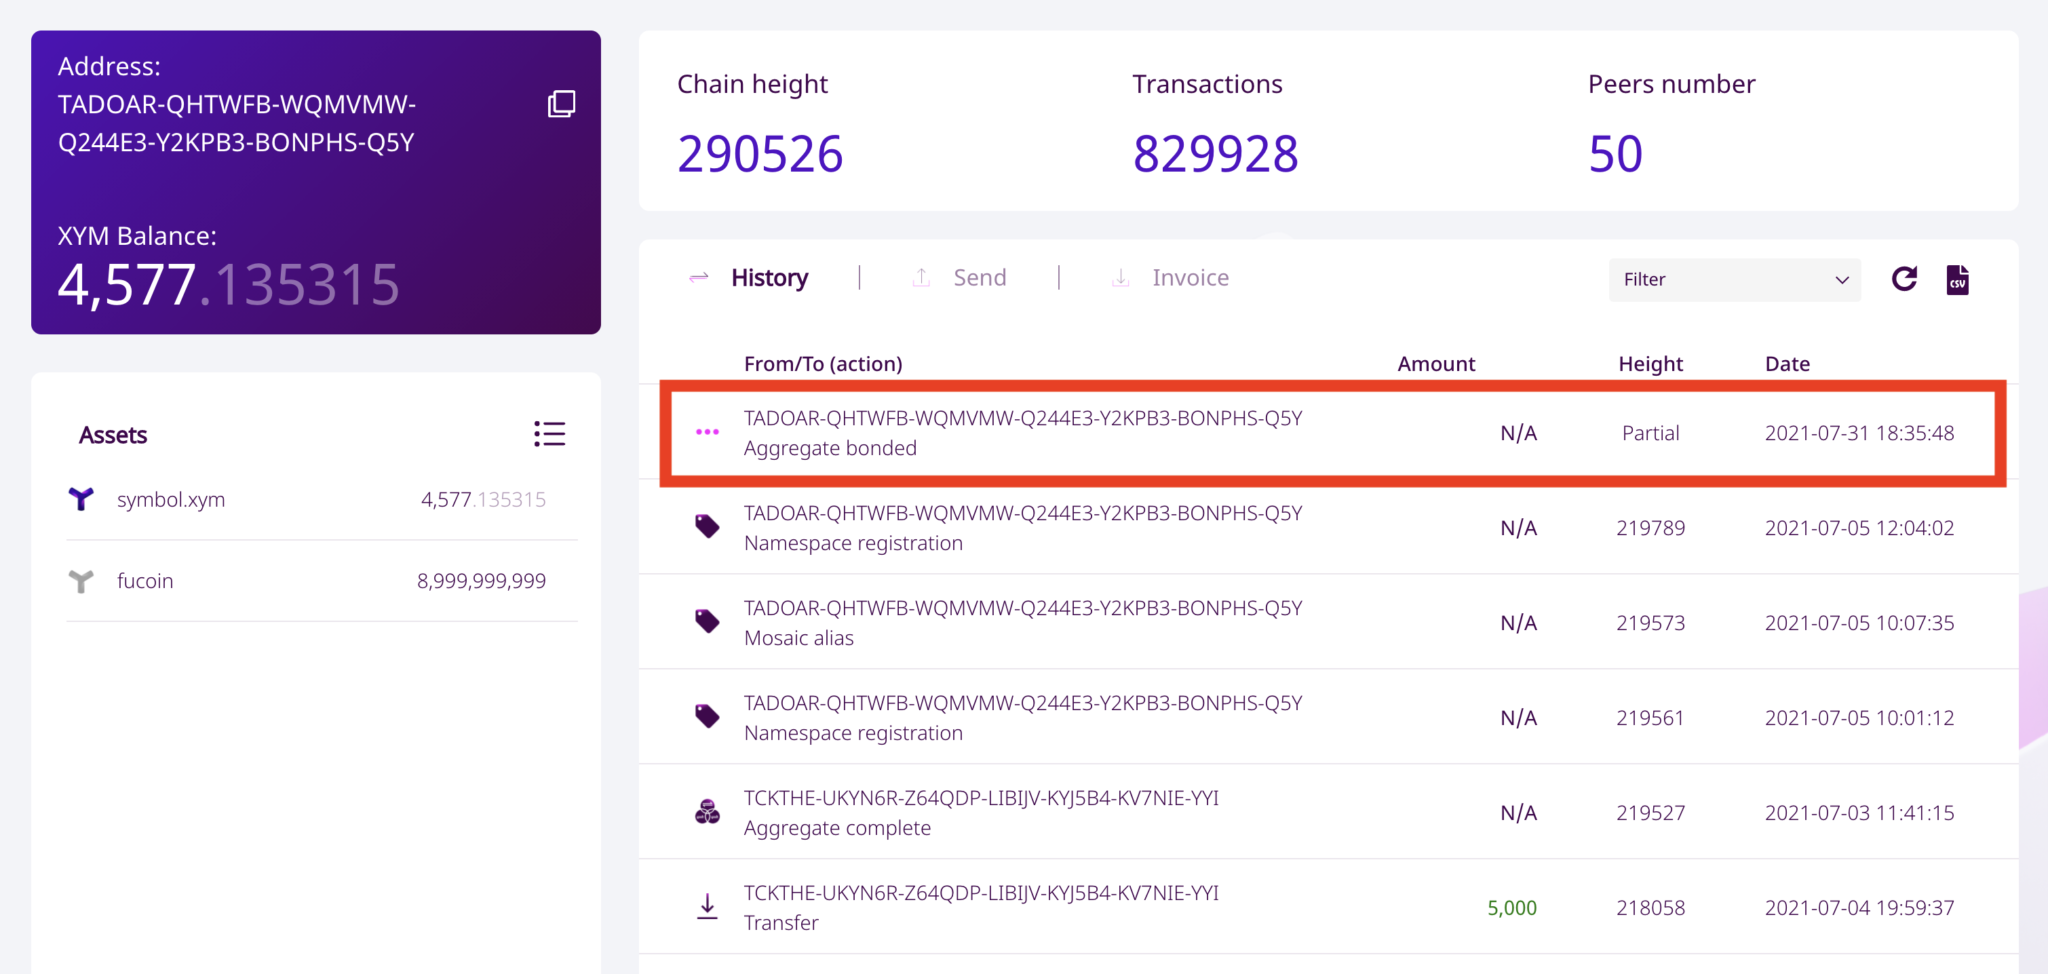
Let’s click on the transaction to see what Alice is doing..
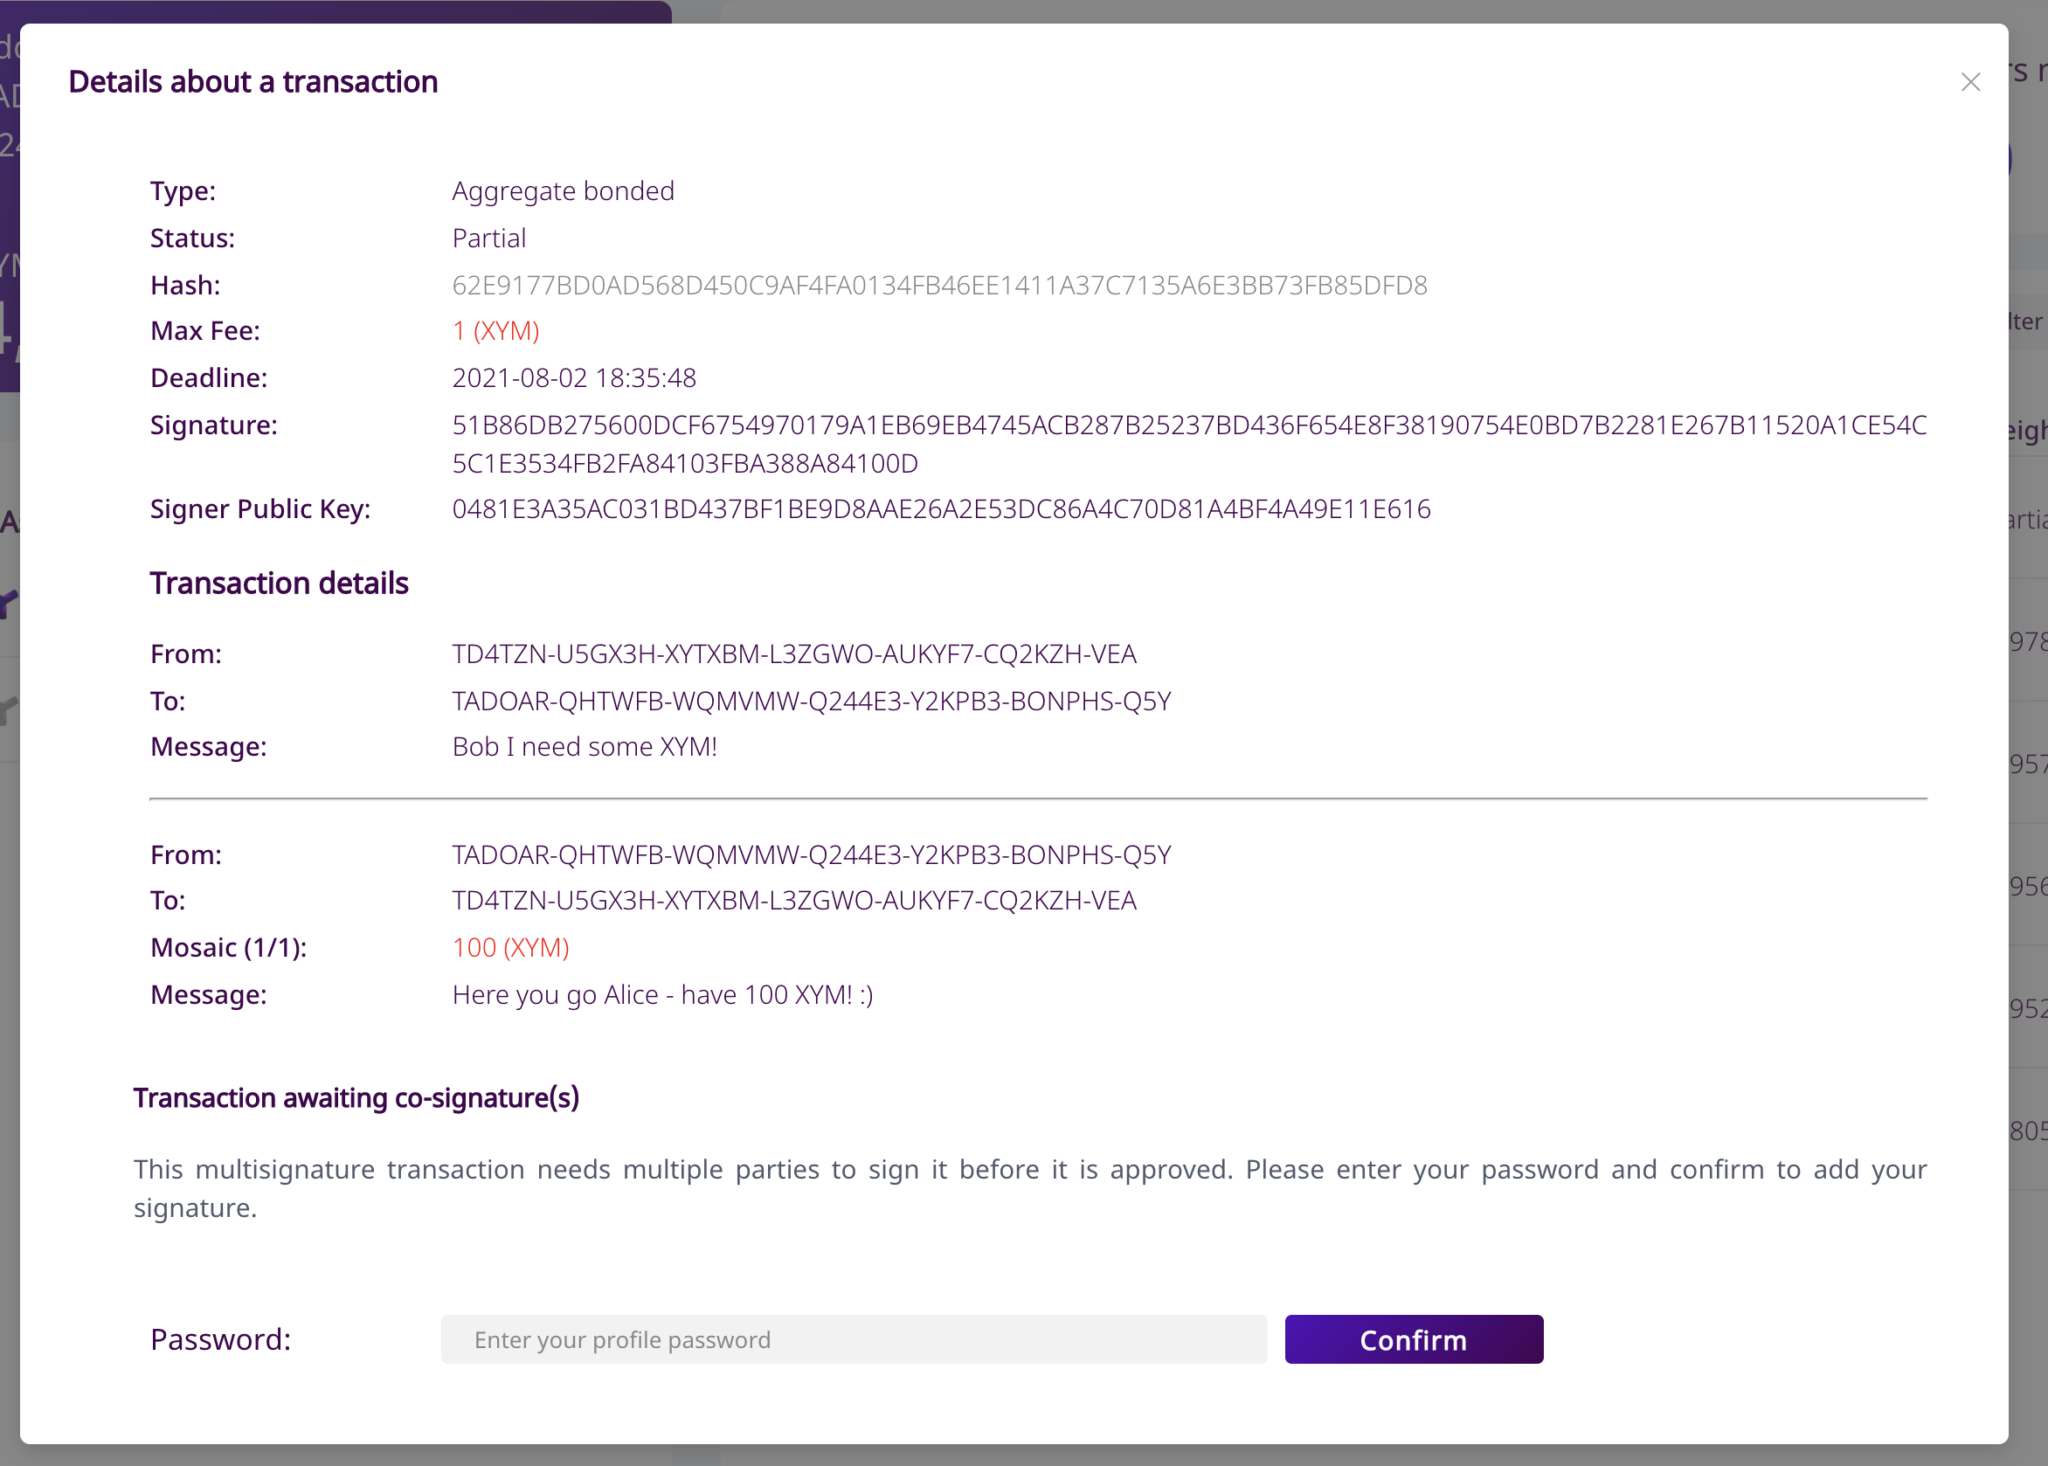
As you can see Alice is asking me to send her 100XYM, I am feeling generous (as this is testnet XYM) so I will sign the transaction. I just need to enter my wallet password to confirm.
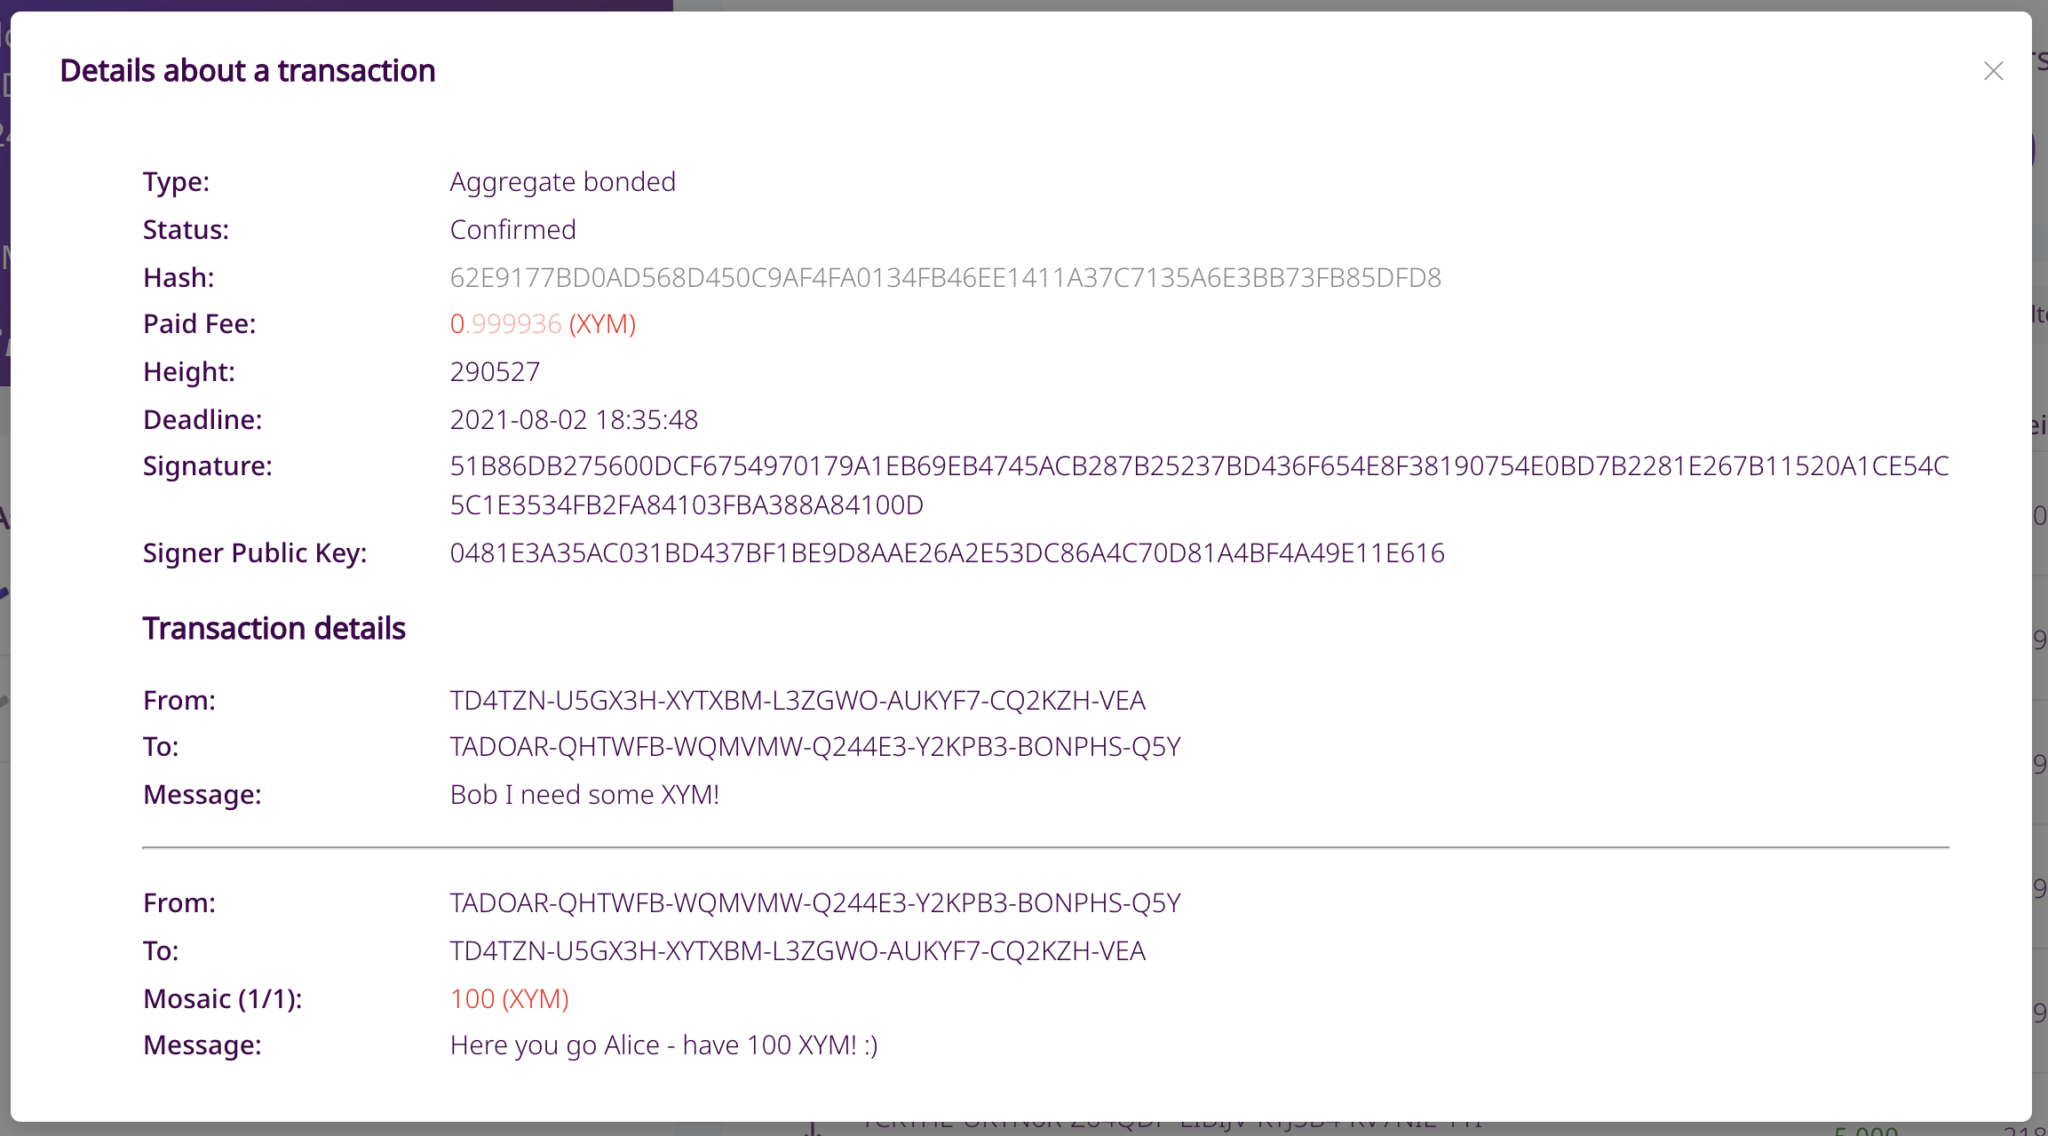
Once I have done this, if I click on the transaction I can see that it has now been confirmed.
So what did that do to Alice and Bob’s accounts?
Well, you can take a look at the hash on the explorer.
Alice’s account contained 30 XYM before sending the transaction. She now has 128 XYM after paying the fees to announce the hash lock and aggregate transaction fees (~2 XYM total). As Bob signed the transaction she was refunded the 10 XYM deposit and she also received the 100 XYM from Bob!

Signing in Python rather than using the wallet
In xembook’s example, he also shows how Bob can sign the transaction in Python. All Bob needs to know is the hash that Alice has signed. He can then sign this himself and announce it to the network.
hexlifiedSignedHash = str(bobKeypair.sign(unhexlify(str(hash))))
payload ={
   "parentHash":str(hash),
   "signature":hexlifiedSignedHash,
   "signerPublicKey":str(bobPubkey),
   "version":"0"
 }

conn = http.client.HTTPConnection("sym-test-01.opening-line.jp",3000)
conn.request("PUT", "/transactions/cosignature", json.dumps(payload),headers)

response = conn.getresponse()
print(response.status, response.reason)
statusHash = facade.hash_transaction(aggregate)
print('http://sym-test-01.opening-line.jp:3000/transactionStatus/' + str(statusHash))
Summary
Aggregate bonded transactions are powerful tools and I am just beginning to understand what they can be used for. As a simple example, if I had agreed to sell someone a mosaic for 1000 XYM then I could set up a transaction that requests 1000 XYM from the buyer’s account and includes the transfer of my mosaic to their address. This then makes the transaction safe since if the buyer is not happy they don’t sign, I don’t lose my mosaic and they don’t lose their 1000 XYM. I would lose my 10XYM deposit though!
These transactions can also involve multiple accounts and multiple transactions. in fact, the documentation states that Symbol supports up to 25 cosignatories and 1000 inner transactions per aggregate. This means that you can set up some really complex transactions and I am sure it will cover most use cases that you can think of!
Thanks again for reading and a huge thank you to@xembook for his original article. As usual, I have included a Jupyter Notebook for you to get started (don’t forget to put in your own account details). Feel free to experiment and edit and let me know how you get on! 😁
I’m a Symbol and NEM enthusiast and run this blog to try to grow awareness of the platform in the English-speaking world. If you have any Symbol news you would like me to report on or you have an article that you would like to publish then please let me know!
Sorry, the comment form is closed at this time.