
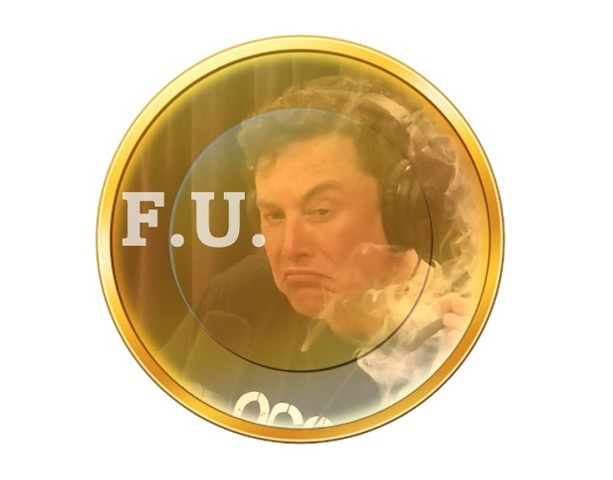
05 Jul The birth of FUcoin: making a mosaic
So back on 12th May 2021 Elon Musk made his infamous (and ill informed?) tweet about the environmental impact of Bitcoin and upset a lot of people.
When I woke up on the 13th and saw it (and coinmarketcap) I, probably like many of you, got pretty annoyed. I was already mad about the incessant shilling of Dogecoin so this really pissed me off (don’t worry I am over it now).
So as a big f*** you er.. thank you to Mr Musk I decided to make a new token, known as a “mosaic”, on the Symbol blockchain. I decided my coin would be called “FUCoin”. I remember that DoucheCoin and some other (more offensive) names had already been used for other unrelated crypto tokens previously and I wanted something unique.
Here’s my original tweet from May 13th:
Before people get angry with me. This was obviously a joke, and probably a bad one, but it turned into a really useful exercise to see how easy it would be to set up a new token on Symbol. Spoiler, it was super quick and incredibly simple. You don’t need to be Elon Musk to to attempt it.
How to make a mosaic
I did this on the mainnet at the time but didn’t keep any screenshots (I didn’t think that I would be writing a blog back then – how quickly times change!). So, in this post I will go through the same process but on the Symbol testnet. By the end of this article hopefully you will see how outrageously easy it is to make a new token on the Symbol blockchain..
Getting set up
For this exercise you will need to download and install the Symbol wallet, set up a new testnet address (or use a current address if you have one) and receive some testnet XYM from the faucet.
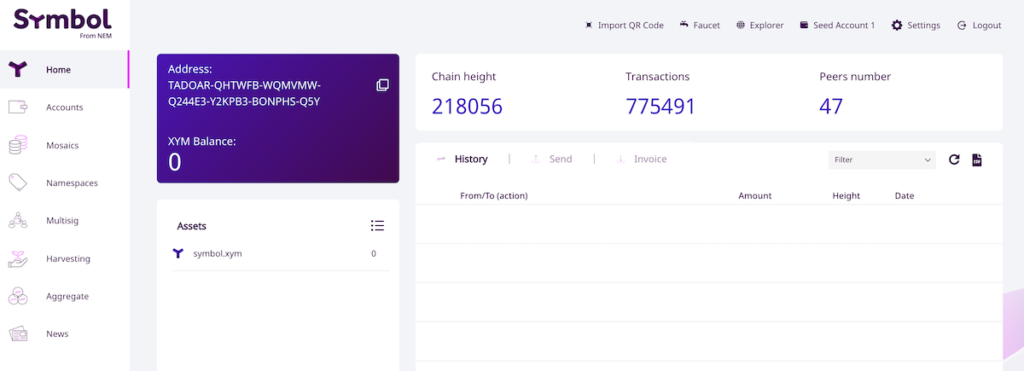
In the screenshot above you can see that I have set up a new wallet on the Symbol testnet with the address TADOARQHTWFBWQMVMWQ244E3Y2KPB3BONPHSQ5Y. As you will also see, the balance of this account is 0. So we need to fund the account with some testnet XYM. How do we do this? Well there is a Symbol faucet where you can enter your testnet address and select how much testnet XYM you require, up to 10,000 XYM.
In the example below I have requested 5000 testnet XYM to be sent to my account TADOARQHTWFBWQMVMWQ244E3Y2KPB3BONPHSQ5Y.
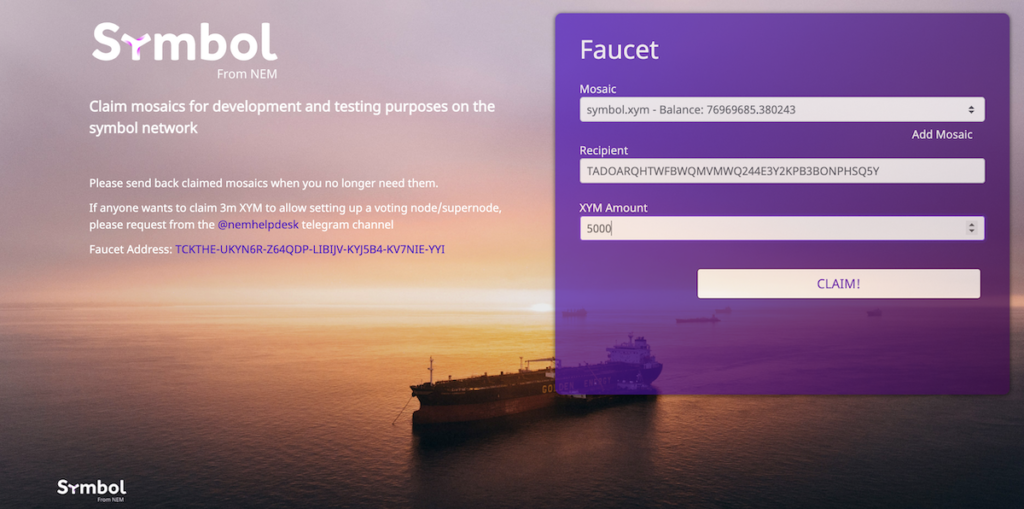
Sure enough when I check my wallet I can see that the funds have been received and my testnet balance is now 5000 XYM. If only it was this easy to get mainnet XYM!

Making a mosaic
Now that we are set up we can make a new mosaic using the Symbol wallet. Just navigate to “Mosaics” on the left-hand menu and then to “Create new mosaics”. Here you will be presented with the screen below:

This is the most confusing part so bear with me. There are several options here:
- From – this is the address of the account that you want to use to create the mosaic, in my case it just says “seed account” as I didn’t rename the account. It corresponds to the address we just set up (
TADOARQHTWFBWQMVMWQ244E3Y2KPB3BONPHSQ5Y). - Supply – this is the number of total tokens that you will create, up to a maximum of 8,999,999,999. It is slightly confusing as setting this number will depend on what you set the divisibility value to. I will come back to this in a minute..
- Divisibility – this is the maximum number of decimal places you will allow i.e. the smallest denomination of your token permitted. Again I will come back to this.
- Duration – this is how long you would like this token to be valid for and it is measured in number of blocks. A new block, on average, is created every 30 seconds on the Symbol blockchain. Therefore if I were to set the duration to 120 blocks the token would exist for 1 hour. You can also check the “unlimited duration” box below this field to make the mosaic last forever rather than for a predetermined time.
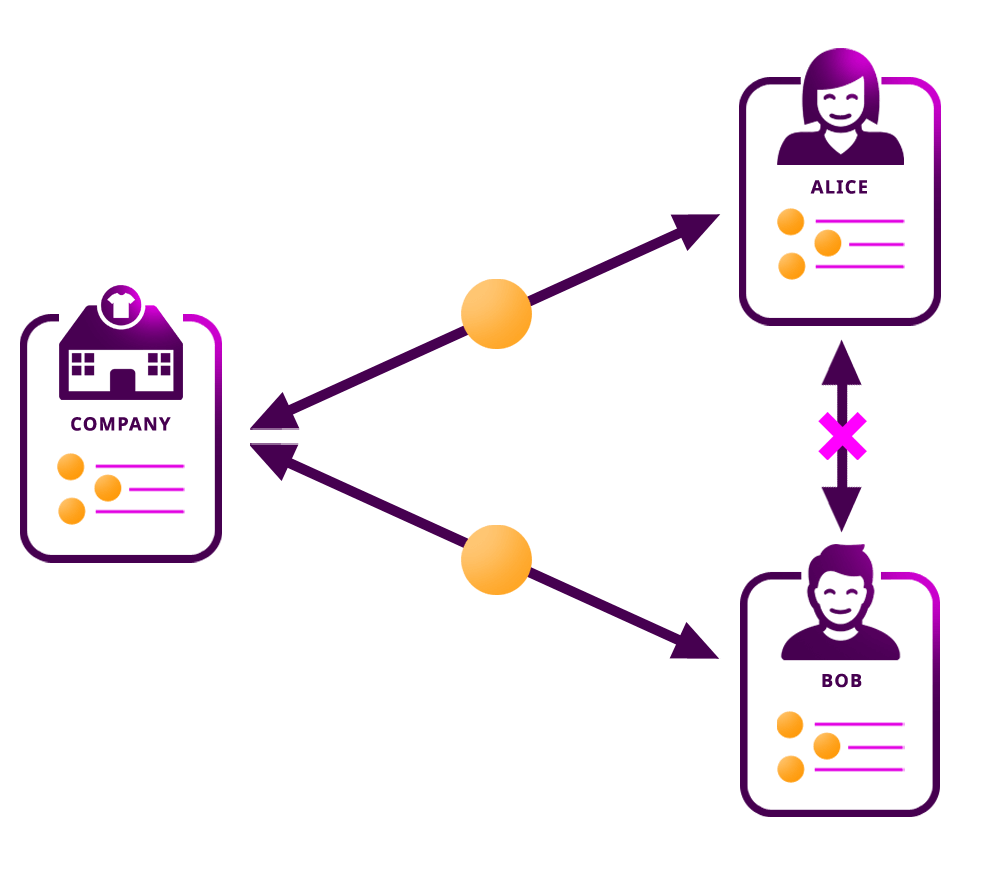
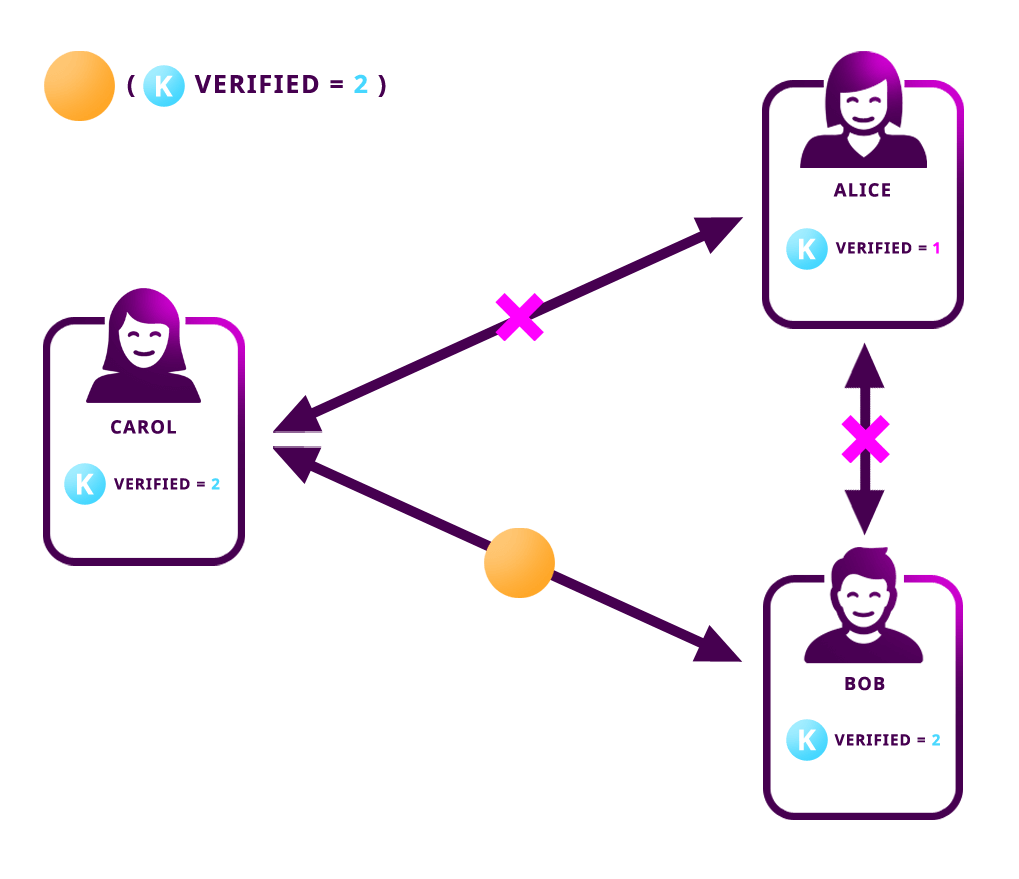
- There remainder of the check boxes determine how the token behaves. Transferable means that the token can be transferred between two arbitrary accounts (rather than just between the token generating account and the account it sends the token to). Supply mutable means that the total token supply can be edited by the account that creates the mosaic at some point in the future. Restrictable means that the mosaic owner can set up custom rules on transfer restrictions. A visual guide to these parameters are shown below and taken from the Symbol documentation.
The setup
So, that’s the basics covered.. Let’s go back to my example above:

Here I have set the total supply to be 8,999,999,999,000,000 or 8.999 quadrillion(!) units. How is this possible given a maximum supply of 8,999,999,999? Well this is because I am allowing fractional units of a token and in this case I have set the divisibility to 6. If I had set the divisibility to zero (only allowed whole tokens to be sent and received) then the maximum token supply would be 8,999,999,999. As I have a divisibility of 6 I have to add 6 zeros to the end of whatever number I want to be my maximum supply.
This is the tricky part to get your head around but just take the max supply you want for your token and add the same number of zeros to the end of this number as you have set for your divisibility value. Then you will always get the right number of tokens in the end.
So that section was way longer than I thought it would be but hopefully I explained everything in enough detail, if you want further information then please check out the mosaic documentation.
Sending the transaction
Once you are happy with your mosaic setup just hit the “Send” button. You can see here that the estimated rental fee is 50XYM and on top of this you will pay a small transaction fee (a fraction of 1XYM).

Once the transaction is confirmed you should see that your balance is adjusted and the mosaic is now in your account!
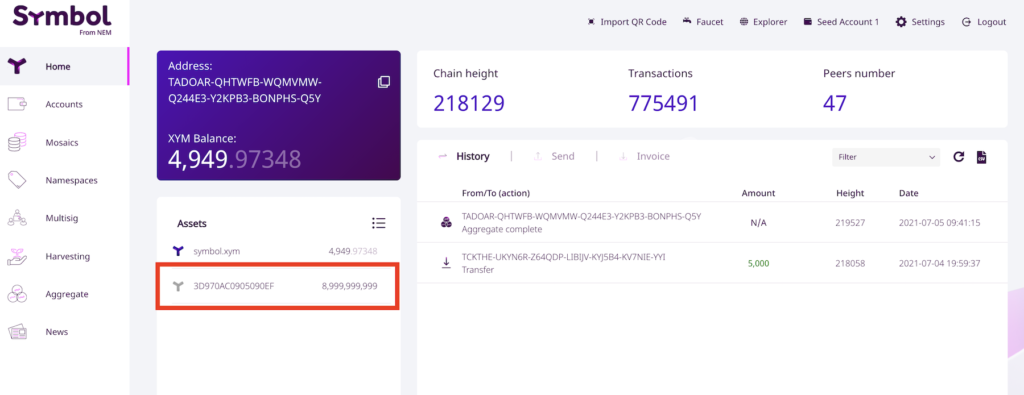
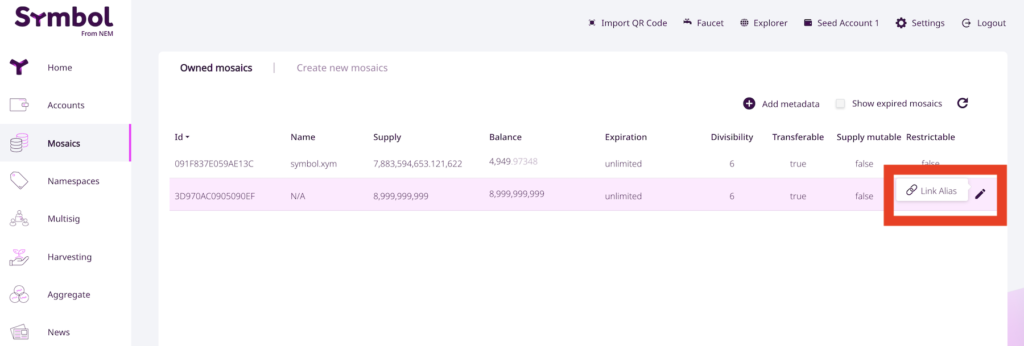
We have now made a new mosaic with a total supply of 8,999,999,999 and a divisibility of 6 with unlimited duration. You can see that the mosaic has an identifier 3D970AC0905090EF but this isn’t the most catchy of names. How do we associate the mosaic ID to a human readable catchy name like “symbol” or “fucoin”?
Namespaces
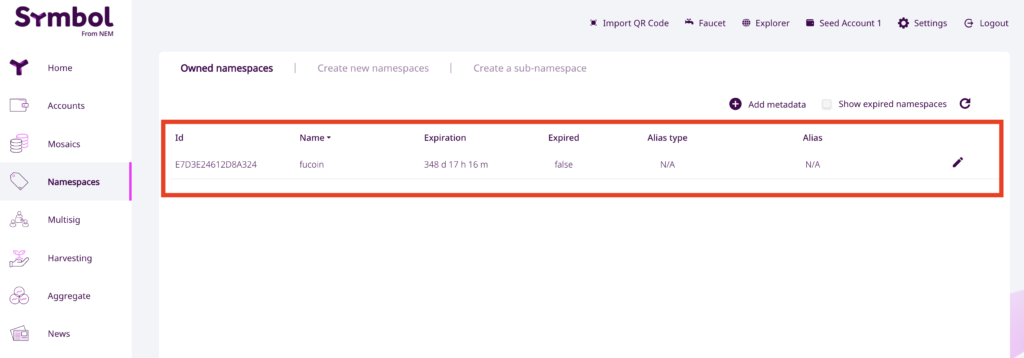
In order to associate your weird mosaic ID to a catchy name you will need to create a namespace. You can again do this really easily in the Symbol wallet. Here is an example for creating the namespace “fucoin”. Also just as a side note I didn’t call it FUCoin as you can’t have capital letters in the namespace name.
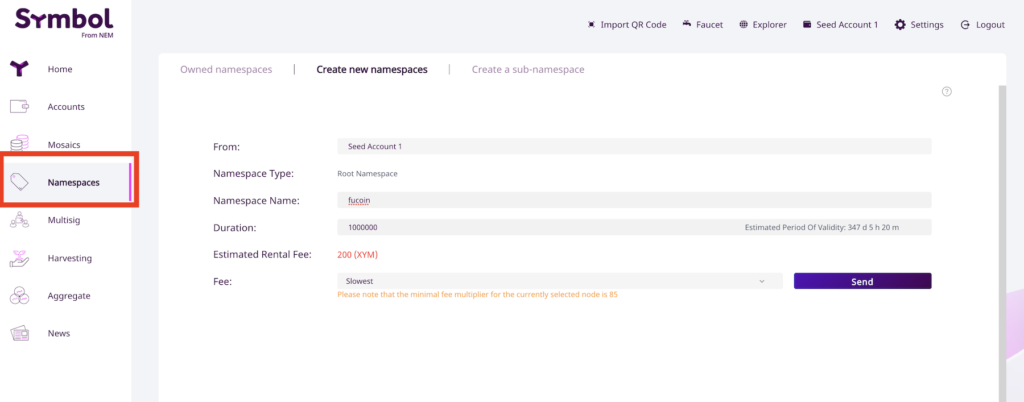
As you can see you just need to navigate to “Namespaces” in the wallet and then go to “Create new namespaces”. On this screen you just need to provide a name for your namespace (in my case fucoin) and set a duration.
Now, you are essentially renting the namespace, it is a bit like when you register a domain name and you have to renew it on an annual basis. With namespace rentals you are charged for the number of blocks that you want to rent for.
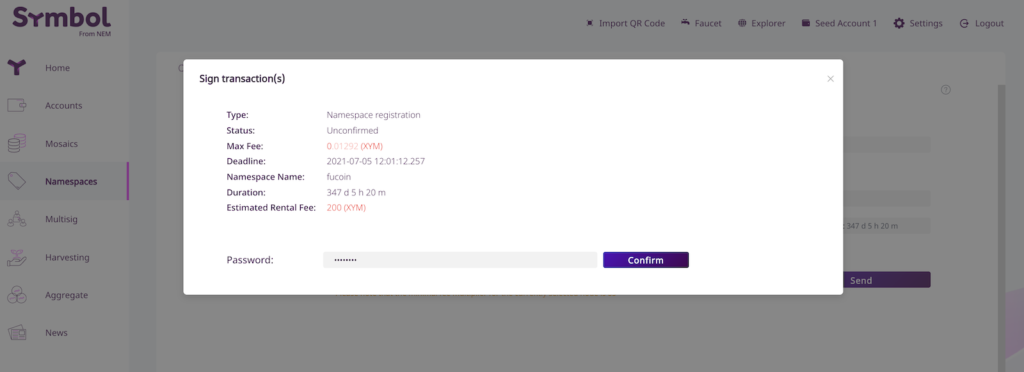
In the example I have selected a duration of 1,000,000 blocks. This equates to 347 days (almost a year) and would cost 200 XYM. If I were to set it to 100,000 blocks then it would last for 34 days but only cost me 20 XYM. So the the cost of rental scales linearly with the duration that you would like your mosaic to be active. You can also extend the duration of you rental at a later date (a bit like renewing your domain name).
So as before we send our transaction with the “Send” button.
Then once the transaction is confirmed we can navigate to “Owned namespaces” and can see that fucoin now belongs to us.
Associating a mosaic to a namespace
We have now created a mosaic and registered a namespace. How do we link the two so that rather than sending our token 3D970AC0905090EF we send “fucoin” and this name will then be displayed in the user’s wallet? Simple!
Again in the wallet just navigate back to the Mosaics screen, find your newly created mosaic (in my case 3D970AC0905090EF) and click the little pencil icon on the right of the row and select “Link Alias”
Once you have clicked this you can set your mosaic to be associated with your namespace:
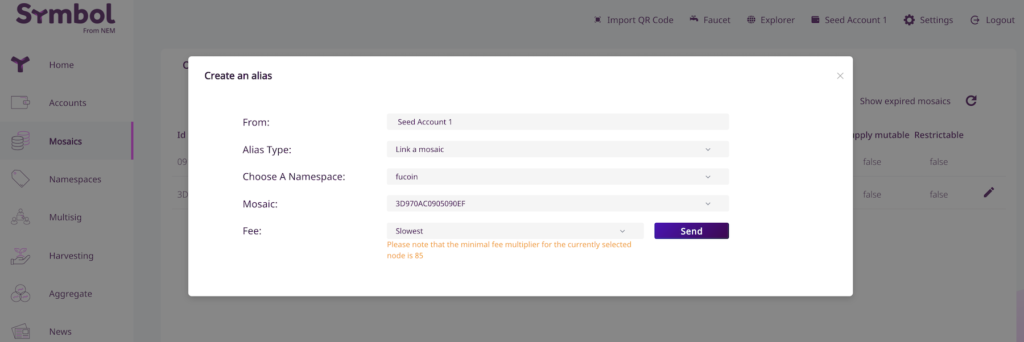
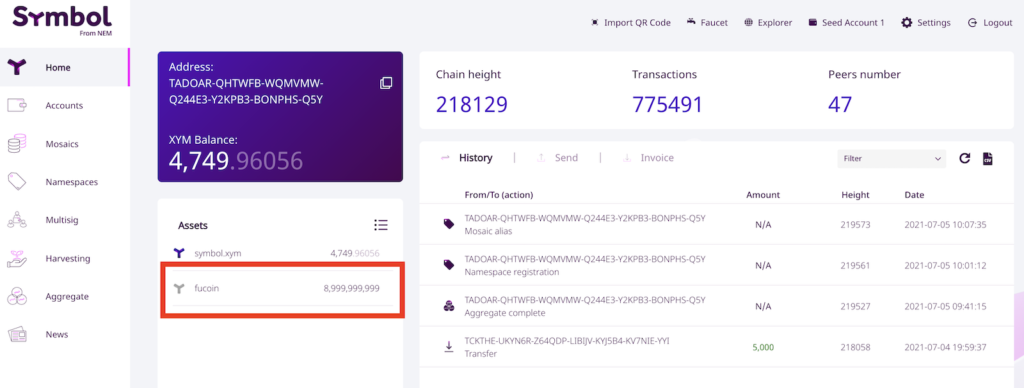
Perfect! If I now look at my owned mosaics I see that I own fucoin!
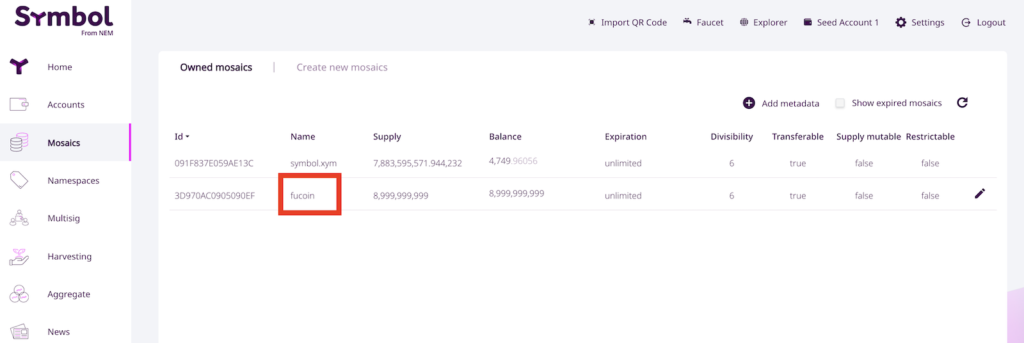
We can also see that we have fucoin listed in our wallet and when we send FUCoin tokens to another wallet they will also see the mosaic name in their “Assets”.
As simple as that

So that was how I created FUCoin to celebrate the genius that is Elon Musk. It started as a joke but turned into a realisation that it is super easy to do. I managed the process in less than 5 minutes, it probably took longer than that for you to read this post!
The take home message for me when I started playing with mosaics and namespaces was that it is so freaking easy to create a new digital asset using Symbol! I would bet that if I sent a step by step guide to my 70 year old dad he would be able to do it (I wouldn’t bet much though as he is totally technically illiterate). Have a play around on testnet and see for yourself how easy it is!
Thanks for reading this latest post. Sorry it was a bit longer than I expected but you made it to the end so thank you for that! 😊
I’m a Symbol and NEM enthusiast and run this blog to try to grow awareness of the platform in the English-speaking world. If you have any Symbol news you would like me to report on or you have an article that you would like to publish then please let me know!
Oliver
Posted at 21:20h, 05 JulySuch an entertaining and informative read. Thank you!