
30 Jun How to create a transferable NEM address book in a Google Spreadsheet
translated by @alediemme and @RadioRa26841511
This technical article caught our eye recently and we thought that we should report on it. The original article in Japanese written by nem_takanobu in 2020 can be found here and we have tried our best to translate it for you! It is a NEM NIS1 article that uses nem2-sdk but it could be adapted to work with Symbol transactions too.
nem_takanobu created an address book that can be used to send XEM or other NEM mosaics using Google Sheets with Google Apps Script (GAS) & NEM Catapult, and we will report on this below.
For more information about GAS and NEM integration, please refer to his recent post on using NEM Catapult with Google Apps Script (GAS). In this article, he takes this one step further and shows up how to link Google Sheets with NEM Catapult.
He refers to the (catchily titled!) “WEBIRD PROGRAMMING.TECH’s article “(GAS) You can also create web apps and APIs. Here is a summary of what you can do with HtmlService.~Part 3: Spreadsheet UI~”. A link to this document can be found here.
How does it work?
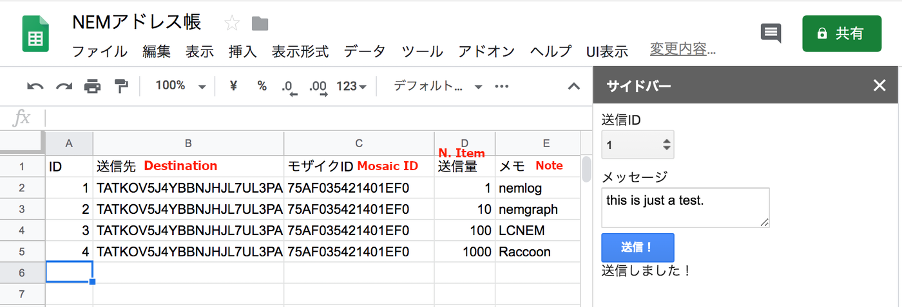
The spreadsheet layout is shown in Figure 1. It shows the destination (column B), mosaic ID / token (column C), and the amount to be sent (column D) with each of the rows representing a different transaction. You can also leave a note of the recipient (Fig 1. column E) to keep track of who you are sending transactions to. The spreadsheet can be selected from the menu to display in the sidebar (Figure 1, right), select the send ID and add the message to send the mosaic.
Program Structure
The tool presented here consists of two separate components:
- code.gs
- sidebar.html
code.gs
The Google script code.gs is responsible for adding the menu, displaying the sidebar contents and listing data from the spreadsheet in the sidebar.
sidebar.html
This html code displays the sidebar content and handles the sending of the transaction.
Program details
Open the spreadsheet and on the first line add the following information (as shown in Figure 1):
- ID
- Address to send to
- Mosaic ID
- Amount to send
All following columns will be ignored so they can be used for providing additional notes (e.g. who the transaction was sent to, date of sending etc).
Next, select Tools->Script Editor from the menu to open the Google Apps Script editing window, and create the two files shown below. Once you have created the files, select Publish -> Deploy as Web Application and build them. The author notes that there may be a more appropriate way to do this, such as deploying as a spreadsheet add-on, but they were not sure at the time of writing.
Google Apps Script (code.gs)
//メニューに追加
function onOpen() {
  var ui = SpreadsheetApp.getUi();
  ui.createMenu('UI表示')
    .addItem('サイドバーを表示', 'showSidebar')
    .addToUi();
}

//サイドバーコンテンツ表示
function showSidebar() {
  var sidebar = HtmlService
    .createTemplateFromFile('sidebar.html')
    .evaluate()
    .setSandboxMode(HtmlService.SandboxMode.IFRAME)
    .setTitle('サイドバー')
  SpreadsheetApp.getUi().showSidebar(sidebar);
}

//IDリストの取得
function getIds() {
  var values = getData();
  var ids = [];
  for(var i = 1, l = values.length; i < l; i++) {
    ids.push(values[i][0]);
  }
  return ids;
}

//送信データの取得
function sendNEM(id) {

  var prop = {};
  var values   = getData();
  prop.address = values[id][1];
  prop.mosaicId = values[id][2];
  prop.amount    = values[id][3];

  return prop;
}

//データ取得
function getData() {
  var ss = SpreadsheetApp.getActiveSpreadsheet();
  var sheet = ss.getActiveSheet();
  var value = sheet.getDataRange().getValues();
  return value;
}
html code (sidebar.html)
<!DOCTYPE html>
<html>
  <head>
    <base target="_top">
    <link rel="stylesheet" href="https://ssl.gstatic.com/docs/script/css/add-ons.css">
    <script src="//ajax.googleapis.com/ajax/libs/jquery/1.11.0/jquery.min.js"></script>
  </head>
  <body>
    <label for="send-id">送信ID</label>
    <br>
    <select id="send-id" name="send-id" style="margin-bottom: 10px;" >
      <?
        var ids = getIds();
        for(var i = 0, l = ids.length; i < l; i++) {
          output.append('<option value="' + ids[i] + '">' + ids[i] + '</option>');
        }
      ?>
    </select>
    <br>

    <label for="message">メッセージ</label><br>
    <textarea id="message"></textarea><br>

    <button class="action" onclick="sendNEM()">送信!</button><br>
    <div id="send-status"></div>

<script src="https://s3-ap-northeast-1.amazonaws.com/xembook.net/nem2-sdk/nem2-sdk-0.16.1.js"></script>
<script>
const NODE = 'https://jp5.nemesis.land:3001';
const nem = require("/node_modules/nem2-sdk");
const alice  = nem.Account.createFromPrivateKey('DF1A2101A6BA32F33C60B6A59AA72170BB0AC5A4E1057FBA706DC2B999E902C4', nem.NetworkType.TEST_NET);
const GENERATION_HASH = "CC42AAD7BD45E8C276741AB2524BC30F5529AF162AD12247EF9A98D6B54A385B";

function sendNEM() {

    var id = $("#send-id").val();

    google.script.run
    .withFailureHandler(function(err) {
          $("#send-status").html(err);
    })
    .withSuccessHandler(function(res) {

        const tx = nem.TransferTransaction.create(
            nem.Deadline.create(),
            nem.Address.createFromRawAddress(res.address),
            [
            new nem.Mosaic(
                new nem.MosaicId(res.mosaicId),
                nem.UInt64.fromUint(res.amount)
            )
            ],
            nem.PlainMessage.create($("#message").val()),
            nem.NetworkType.TEST_NET,
            nem.UInt64.fromUint(100000)
        );

        const signedTx = alice.sign(tx,GENERATION_HASH);
        const txHttp = new nem.TransactionHttp(NODE);
        console.log(NODE + "/transaction/" + signedTx.hash + "/status");

        txHttp
        .announce(signedTx)
        .subscribe(_ => console.log("ネットワーク通知"), err => console.error(err));

        console.log(res);
        $("#send-status").html('送信しました!');
    })
    .sendNEM(id);  // GAS側のsendNEM関数を呼び出し
}
    </script>
  </body>
</html>
Running the tool
Display the spreadsheet and select UI View->Show Sidebar from the menu to show the sidebar. Select the ID you want to send from the list box, add a message, and click the Send button to send the NEM blockchain based on the data in the spreadsheet.
Final comments
nem_takanobu has shown how to implement a function to send from data on a Google spreadsheet using the REST API function of the NEM blockchain. I hope you will take this opportunity to get inspired and to start developing on the NEM blockchains.
I’m a Symbol and NEM enthusiast and run this blog to try to grow awareness of the platform in the English-speaking world. If you have any Symbol news you would like me to report on or you have an article that you would like to publish then please let me know!
Sorry, the comment form is closed at this time.